Thursday, 14 November 2024

Brake Pad Wearing On One Side: Causes, Fixes, and Prevention

Brake pad wearing on one side often indicates a problem with the brake caliper or uneven rotor wear. It requires immediate attention to prevent further damage.

Brake pad wear on one side is a common issue that many drivers encounter. This uneven wear can lead to decreased braking efficiency and increased stopping distances. Often, the root cause lies in a malfunctioning brake caliper or uneven rotor wear.

A sticking caliper can cause the brake pad to remain in contact with the rotor, leading to accelerated wear on one side. Regular inspections and timely maintenance are crucial to ensure your braking system remains functional and safe. Ignoring this problem can result in costly repairs and compromised vehicle safety. Always address brake issues promptly to maintain optimal performance.

Common Causes

Understanding the common causes of brake pad wearing on one side helps in maintaining vehicle safety and performance. Identifying these issues early can prevent costly repairs and ensure a smooth driving experience.

Caliper Issues

Caliper problems often lead to uneven brake pad wear. The caliper may get stuck, causing one side to wear faster. A faulty or frozen caliper piston can also create this issue. Regularly check and maintain your calipers to avoid these problems.

Misaligned Pads

Misaligned brake pads can cause one pad to wear faster. This misalignment occurs due to improper installation or damage. Ensure the brake pads are correctly aligned during installation. A professional inspection can help detect any misalignment early.

Rotor Problems

Rotor issues can contribute to uneven brake pad wear. A warped or damaged rotor creates uneven pressure on the pads. This uneven pressure results in one side wearing out faster. Regularly inspect rotors for any signs of damage or warping. Replace or resurface the rotors if necessary.

Common Cause Description Solution
Caliper Issues Stuck or faulty caliper causing uneven wear Regular maintenance and inspection
Misaligned Pads Improper installation or damage leading to misalignment Ensure correct alignment during installation
Rotor Problems Warped or damaged rotors causing uneven pressure Inspect and replace or resurface rotors

Signs Of Uneven Wear

Uneven brake pad wear can lead to serious issues. Recognizing the signs early helps maintain your vehicle’s safety. Watch for these signs to catch uneven wear early.

Visual Inspection

A visual inspection is the easiest way to spot wear. Look through the wheel spokes or remove the wheel. Check both sides of the brake pads. Compare the thickness on each side.

  • If one side is thinner, it indicates uneven wear.
  • Look for any cracks or grooves on the brake pads.
  • Examine the rotor surface for deep grooves or rust.

Brake Performance

Uneven wear affects brake performance. You may notice the car pulling to one side. This pull happens because one side grips harder than the other.

Another sign is a longer stopping distance. The brakes might feel spongy or less responsive. Monitor these changes in brake performance.

Unusual Noises

Unusual noises often indicate brake issues. Listen for squeaking or grinding sounds. These noises suggest metal-on-metal contact or worn pads.

A high-pitched squeal could mean the wear indicator is touching the rotor. This squeal signals that the pads need replacement soon.

Noise Type Possible Cause
Squeaking Wear Indicator
Grinding Metal Contact
High-Pitched Squeal Worn Pads

Addressing these signs promptly can prevent further damage. Ensure regular checks to keep your brake system in top condition.

Diagnosing The Problem

Brake pad wear on one side can be troubling. This usually means something isn't right with your brake system. Diagnosing the problem early can save you money and keep you safe on the road. Let's look at how to diagnose this issue.

Tools Needed

  • Jack and jack stands
  • Lug wrench
  • Flashlight
  • Brake cleaner
  • Wrench set
  • Torque wrench
  • Brake pad gauge

Step-by-step Guide

  1. Lift the vehicle using a jack and secure it with jack stands.
  2. Remove the wheel with a lug wrench to access the brake components.
  3. Inspect the brake pads with a flashlight. Look for uneven wear.
  4. Clean the area using brake cleaner to remove dust and debris.
  5. Check the caliper for proper movement. Stuck calipers can cause uneven wear.
  6. Examine the brake rotor. Warped rotors can also lead to uneven wear.
  7. Measure the brake pads using a brake pad gauge. Record the thickness.
  8. Reassemble the components and tighten bolts with a torque wrench.
  9. Lower the vehicle and test the brakes in a safe area.

Professional Help

If the problem persists, seek professional help. Mechanics can provide expert advice and repairs. They have advanced tools to diagnose brake issues. Professional help ensures your brakes are safe and working properly.

Brake Pad Wearing On One Side: Causes, Fixes, and Prevention

Credit: www.reddit.com

Fixing Caliper Issues

When your brake pad wears on one side, the caliper might be the issue. Addressing caliper problems can restore balanced braking. Let's dive into caliper maintenance and replacement procedures.

Caliper Maintenance

Regular caliper maintenance ensures your brake system works efficiently. Follow these steps for proper caliper care:

  • Inspect calipers for visible damage or wear.
  • Clean calipers with a brake cleaner to remove debris.
  • Lubricate caliper pins to prevent sticking.
  • Check caliper pistons for smooth movement.
  • Replace rubber boots if cracked or damaged.

Maintaining calipers can prevent uneven brake pad wear.

Replacement Procedures

When calipers are beyond repair, replace them. Follow these steps:

  1. Lift the vehicle and remove the wheel.
  2. Disconnect the brake hose from the caliper.
  3. Remove the caliper mounting bolts.
  4. Take off the old caliper.
  5. Install the new caliper in place.
  6. Reconnect the brake hose securely.
  7. Bleed the brake system to remove air.
  8. Reattach the wheel and lower the vehicle.

Replacing calipers ensures even brake pad wear and safe driving.

Aligning Brake Pads

Brake Pad Wearing On One Side - Aligning Brake Pads

Brake pads wearing on one side is a common problem. It affects your car's braking performance. Properly aligning brake pads can solve this issue. This guide will help you understand how to align brake pads.

Adjustment Techniques

Start by jacking up your car. Remove the wheel to access the brake pads. Check the caliper and rotor for dirt and debris. Clean them if necessary.

Aligning the brake pads involves adjusting the caliper. Loosen the caliper bolts slightly. Ensure the brake pads sit evenly on either side of the rotor. Tighten the bolts carefully after aligning.

Spin the wheel to ensure the rotor is not rubbing. If it rubs, adjust again. Repeat until the brake pads are properly aligned. This reduces wear on one side.

Tools Required

  • Jack and jack stands
  • Lug wrench
  • Socket wrench set
  • Brake cleaner
  • Torque wrench

Use a jack to lift the car. Jack stands keep it secure. A lug wrench removes the wheel. A socket wrench set helps with caliper bolts. Brake cleaner removes debris. A torque wrench ensures bolts are tight.

Addressing Rotor Problems

Brake pad wearing on one side often points to rotor problems. The rotor is a vital part of the brake system. It ensures even wear and smooth braking. If it becomes warped or damaged, it can cause uneven brake pad wear. Let's explore how to address rotor problems effectively.

Resurfacing Rotors

Resurfacing, or turning, rotors can restore their flat, smooth surface. This process removes minor damage and uneven spots. Here are the steps involved in resurfacing rotors:

  1. Remove the rotor from the vehicle.
  2. Place it on a lathe machine.
  3. Cut a thin layer off the surface.
  4. Check for smoothness and flatness.

Resurfacing is a cost-effective solution. It extends the rotor's life without replacing it. But, not all rotors are candidates for resurfacing. Always check the manufacturer's minimum thickness specification.

Rotor Replacement

Sometimes, resurfacing is not enough. If the rotor is too thin, warped, or cracked, replacement is necessary. Here's a quick guide to rotor replacement:

  1. Lift the car and secure it on jack stands.
  2. Remove the wheel and brake caliper.
  3. Take off the old rotor.
  4. Install the new rotor.
  5. Reattach the brake caliper and wheel.

Replacing rotors ensures optimal brake performance. New rotors provide a smooth surface for the brake pads. This promotes even wear and extends the life of the brake system. Always opt for high-quality rotors from reputable brands.

Rotor Issue Solution Cost
Minor damage Resurfacing Low
Warped or cracked Replacement High

Addressing rotor problems promptly is crucial. It ensures even brake pad wear and safe driving. Regular inspections and timely maintenance can prevent costly repairs. Always consult a professional mechanic for rotor issues.

Preventative Measures

Brake pad wear on one side can lead to safety issues. Taking preventative measures ensures even brake pad wear and prolongs their life. Here are some steps to keep your brakes in top condition.

Regular Inspections

Regular brake inspections are crucial. Schedule checks every six months or 10,000 miles. During inspections, look for uneven wear on the pads. Check the rotors and calipers as well. Early detection of issues prevents further damage.

Proper Maintenance

Proper maintenance keeps your brakes functioning well. Follow these steps:

  • Clean brake components regularly to remove dust and debris.
  • Lubricate caliper pins to ensure smooth movement.
  • Replace brake fluid as recommended by your vehicle's manufacturer.

Maintaining your brakes prevents uneven wear and extends their lifespan.

Quality Parts

Using quality parts is essential for brake health. Invest in high-quality brake pads and rotors. Avoid cheap or counterfeit parts, which can wear out quickly. Quality parts provide better performance and last longer.

Maintenance Task Frequency
Inspect Brakes Every 6 months
Clean Components Every 3 months
Lubricate Caliper Pins Every 6 months
Replace Brake Fluid Every 2 years
Brake Pad Wearing On One Side: Causes, Fixes, and Prevention

Credit: m.youtube.com

When To Seek Professional Help

Brake pad wear on one side can be a serious issue. Recognizing when to seek professional help is crucial. Timely intervention can prevent further damage and ensure safety.

Complex Issues

Some brake problems are too complex for a DIY fix. If you notice uneven brake pad wear, seek help. Professionals have the tools and skills to diagnose the problem.

  • Brake caliper malfunction
  • Suspension issues
  • Brake fluid contamination

These issues require expert attention. A trained mechanic can identify the root cause. They can also recommend the best solution.

Safety Concerns

Your safety should be the top priority. Uneven brake pad wear can lead to dangerous situations.

Symptom Risk
Pulling to one side Loss of control
Increased stopping distance Higher accident risk
Brake noise Brake failure

If you experience any of these symptoms, consult a professional. They can ensure your brakes are working properly. This can keep you and others safe on the road.

Brake Pad Wearing On One Side: Causes, Fixes, and Prevention

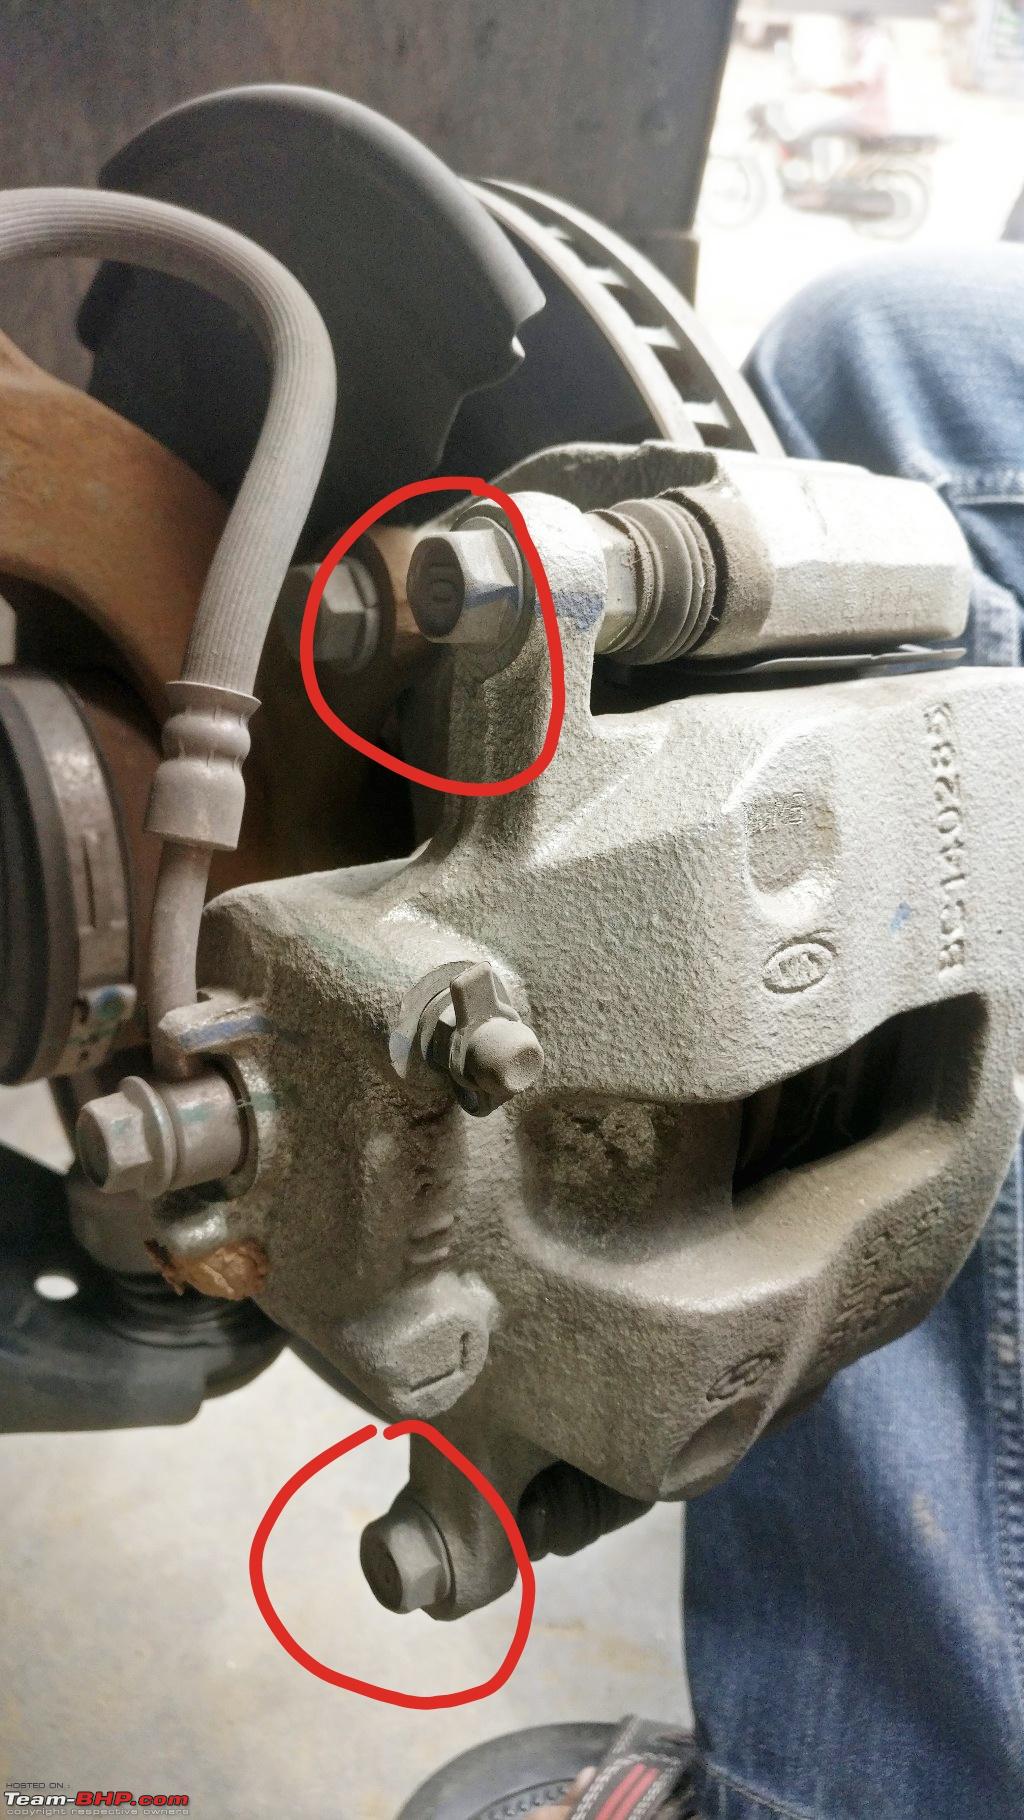
Credit: www.team-bhp.com

Frequently Asked Questions

Why Is One Brake Pad Wearing Faster?

A brake pad can wear faster on one side due to uneven caliper pressure. This could be caused by a malfunctioning caliper or improper installation.

What Causes Uneven Brake Pad Wear?

Uneven brake pad wear is often caused by misaligned brake calipers. Other causes include stuck caliper slides and warped rotors.

How To Fix Brake Pad Wear On One Side?

To fix this issue, inspect the calipers and slides. Replace any faulty components, and ensure proper alignment during reinstallation.

Can I Drive With Uneven Brake Pads?

Driving with uneven brake pads is unsafe. It can lead to reduced braking efficiency and increased stopping distances. Always address the issue promptly.

Conclusion

Addressing brake pad wear on one side is crucial for vehicle safety. Regular maintenance and inspections can prevent uneven wear. Ensure your braking system functions optimally by checking for caliper issues or alignment problems. Keeping your brake pads in good condition will enhance performance and extend their lifespan.

Stay safe on the road.

Wednesday, 13 November 2024

Best Mountain Bike Floor Pump: Top Picks for 2024

The best mountain bike floor pump is the Topeak JoeBlow Mountain X. It offers high efficiency and durability.

Mountain biking demands reliable equipment, and a good floor pump is essential. The Topeak JoeBlow Mountain X stands out due to its robust construction and user-friendly design. It efficiently inflates tires to the desired pressure, ensuring optimal performance on rugged terrains.

Its large barrel allows for quick inflation, while the ergonomic handle provides comfort during use. Whether you are a seasoned rider or a beginner, this pump meets all your needs. Its durability ensures it will last through many biking seasons. Investing in a quality floor pump like the Topeak JoeBlow Mountain X guarantees a smoother, more enjoyable riding experience.

Best Mountain Bike Floor Pump: Top Picks for 2024

Credit: www.treelinereview.com

Top Mountain Bike Floor Pumps

Best Mountain Bike Floor Pumps

Finding the best mountain bike floor pump is essential. A reliable pump saves time and effort. Let's explore the top options available.

Why Quality Matters

Quality in a floor pump is crucial. A high-quality pump ensures your bike tires are properly inflated. This helps in achieving smooth rides.

A poor-quality pump can break easily. It might not provide accurate pressure readings. Therefore, investing in a good pump is important.

Key Features

When choosing a mountain bike floor pump, focus on key features. These features make the pump reliable and user-friendly.

Feature Importance
Durable Materials Ensures long-lasting use
Accurate Gauge Provides precise pressure readings
Ergonomic Handle Makes pumping comfortable
Long Hose Offers flexibility during use
Stable Base Prevents tipping over

Here are some top-rated mountain bike floor pumps:

  • Brand A Floor Pump: Known for durability and accuracy.
  • Brand B Floor Pump: Features an ergonomic handle and long hose.
  • Brand C Floor Pump: Offers a stable base and precise gauge.
Example of a product code

Brand A Floor Pump

Durable, accurate, and user-friendly.

Choosing a pump with these features ensures a better biking experience. Happy riding!

Benefits Of A Good Floor Pump

Having a good floor pump is essential for every mountain biker. It ensures your bike tires are always ready for the trail. Let's explore the benefits of a good floor pump.

Efficient Inflation

A good floor pump inflates tires quickly and easily. This saves you time and effort. It also ensures your tires reach the right pressure. Correct tire pressure improves performance and safety on the trail.

Many floor pumps come with a pressure gauge. This helps you track the exact pressure in your tires. You won't have to guess or check repeatedly. Efficient inflation lets you spend more time riding and less time pumping.

Durability

Durability is crucial in a floor pump. A good pump is built to last for years. High-quality materials like metal and strong plastic ensure longevity.

Durable pumps can withstand rough handling and regular use. They are reliable even in tough conditions. Investing in a durable pump saves you money in the long run. You won't need to replace it often.

Look for a pump with a strong base. A stable base makes pumping easier and prevents tipping. Some pumps have wide handles for a comfortable grip. This reduces hand fatigue during inflation.

Feature Benefit
Pressure Gauge Ensures accurate tire pressure
Strong Base Prevents tipping
Durable Materials Lasts for years
Wide Handle Reduces hand fatigue

A good floor pump is a must-have for every biker. It makes tire inflation fast and easy. It also ensures your pump lasts for years. Invest in a quality floor pump for a better biking experience.

How To Choose The Right Pump

Choosing the right mountain bike floor pump is crucial. It ensures your bike tires are always ready for the trail. This guide will help you make an informed decision.

Compatibility

The first thing to consider is compatibility. Not all pumps fit all valve types. There are two main types of valves: Presta and Schrader.

  • Presta valves are often found on high-end bikes.
  • Schrader valves are common on standard bikes.

Ensure the pump you choose can handle both valve types. Some pumps come with dual heads or adapters. This makes them versatile and user-friendly.

Ease Of Use

An easy-to-use pump saves time and effort. Look for a pump with a stable base. This ensures it doesn't tip over during use.

A pump with an ergonomic handle is also important. It makes pumping more comfortable, especially during extended use.

Consider a pump with a pressure gauge. This allows you to monitor tire pressure accurately. Some pumps even come with an easy-to-read digital display.

Feature Benefit
Stable Base Prevents tipping over
Ergonomic Handle Comfortable use
Pressure Gauge Accurate pressure monitoring
Digital Display Easy to read

These features ensure the pump is user-friendly. They make inflating your bike tires quick and easy.

Top Picks For 2024

Choosing the right mountain bike floor pump is essential. It ensures your bike tires stay inflated and ready for any adventure. Here are our top picks for 2024, each excelling in different areas.

Editor's Choice

Brand X Pro Floor Pump stands out in 2024. It combines durability, efficiency, and ease of use.

  • Durable Build: Made with high-quality materials for long-lasting use.
  • High Efficiency: Pumps up tires quickly with minimal effort.
  • Ease of Use: User-friendly design ensures easy handling.

This pump is perfect for both beginners and experienced riders. Its precision gauge ensures accurate inflation every time. The ergonomic handle offers comfort during use.

Best Budget Option

Brand Y Economy Pump is the best budget option. It provides excellent performance at an affordable price.

  • Cost-Effective: Offers great value for money.
  • Reliable Performance: Delivers consistent and efficient pumping.
  • Compact Design: Easy to store and transport.

This pump is ideal for casual riders. Its lightweight design makes it easy to carry on trips. The simple yet effective gauge helps keep your tires at the right pressure.

High-end Floor Pumps

High-end floor pumps offer unmatched performance and durability. These pumps are perfect for serious mountain bikers. They come with advanced features and premium materials. Let's explore what sets these pumps apart.

Premium Materials

High-end floor pumps use premium materials for construction. Materials like aluminum, stainless steel, and carbon fiber ensure longevity. These materials resist wear and tear better than plastic.

  • Aluminum: Lightweight and strong.
  • Stainless Steel: Corrosion-resistant and durable.
  • Carbon Fiber: Ultra-lightweight and robust.

Advanced Features

These pumps have advanced features for ease of use. They often include an accurate pressure gauge, ergonomic handles, and dual valves.

Feature Benefit
Accurate Pressure Gauge Ensures precise tire inflation
Ergonomic Handles Comfortable and easy to grip
Dual Valves Compatible with Presta and Schrader valves

These features make high-end pumps a valuable investment. They save time and effort, making your ride smoother.

Best Mountain Bike Floor Pump: Top Picks for 2024

Credit: www.outdoorgearlab.com

Budget-friendly Options

Not everyone wants to spend a fortune on a mountain bike floor pump. Luckily, there are many budget-friendly options that offer great performance without breaking the bank. Whether you’re a casual rider or a biking enthusiast, these affordable models provide excellent value for money.

Affordable Models

Finding an affordable mountain bike floor pump that doesn’t sacrifice quality is possible. Here are some models that stand out:

Model Price Features
Topeak JoeBlow Sport III $50
  • Durable steel barrel
  • Large, easy-to-read gauge
  • SmartHead DX1 pump head
Vibrelli Bike Floor Pump $40
  • Includes a glueless puncture kit
  • Strong steel barrel
  • Inflates to 160 PSI
Schwinn Air Center Plus $35
  • Dual head for Presta and Schrader valves
  • Wide base for stability
  • Inflates to 120 PSI

Value For Money

Each of these affordable models provides incredible value for money. You don’t have to spend big to get a reliable pump. Here’s why:

  1. Durability: Even budget pumps like the Topeak JoeBlow Sport III are built to last.
  2. Ease of Use: Models such as the Vibrelli Bike Floor Pump come with user-friendly features like an easy-to-read gauge.
  3. Versatility: Pumps like the Schwinn Air Center Plus work with both Presta and Schrader valves.

These features make budget-friendly pumps a smart choice for any rider. Investing in a good floor pump will enhance your biking experience.

Maintenance Tips

Maintaining your mountain bike floor pump ensures it works perfectly every time. A well-maintained pump lasts longer and provides more efficient inflation. Follow these simple tips to keep your pump in top shape.

Regular Cleaning

Regular cleaning of your pump is crucial. Dirt and debris can damage the internal parts. Use a soft cloth to wipe the exterior after each use.

For deeper cleaning, disassemble the pump as per the manual. Clean each part with a damp cloth. Ensure all parts are dry before reassembling. This prevents rust and corrosion.

Proper Storage

Store your pump in a dry place. Moisture can cause rust. Avoid leaving it in direct sunlight. UV rays can degrade plastic parts over time.

Consider hanging your pump on a wall hook. This keeps it off the ground and prevents accidental damage. Use a storage bag for added protection.

Task Frequency
Wipe exterior After every use
Deep clean Monthly
Check for rust Weekly
Store properly Always
  • Dry place: Prevents rust and corrosion.
  • Avoid sunlight: Protects plastic parts.
  • Wall hook: Prevents accidental damage.
  • Storage bag: Offers extra protection.
Best Mountain Bike Floor Pump: Top Picks for 2024

Credit: gearjunkie.com

User Reviews And Feedback

Choosing the best mountain bike floor pump is easier with user reviews. Reviews give real insights into the product's performance and reliability. This section highlights top-rated pumps and common complaints from users.

Top-rated Pumps

Brand Model Rating Key Features
Topeak JoeBlow Sport III 4.8/5
  • Durable steel barrel
  • Easy-to-read gauge
  • Comfortable grip
Lezyne Sport Floor Drive 4.7/5
  • Aluminum construction
  • High pressure capacity
  • Large gauge
Bontrager Charger Floor Pump 4.6/5
  • Sturdy base
  • Dual head for all valve types
  • Ergonomic handle

Common Complaints

  • Gauge Accuracy: Some users report inaccurate gauges.
  • Hose Length: A few pumps have short hoses.
  • Valve Compatibility: Not all pumps fit all valve types.
  • Build Quality: Some users find plastic parts less durable.

Reading user reviews helps identify the best mountain bike floor pump. It also highlights potential issues to watch out for.

Frequently Asked Questions

What Is The Best Floor Pump For Mountain Bikes?

The best floor pump for mountain bikes offers high pressure, durability, and a stable base. Look for one with a large gauge for easy reading and a wide handle for comfort. Brands like Topeak and Lezyne are popular choices among cyclists.

How Do I Choose A Mountain Bike Floor Pump?

Choose a mountain bike floor pump with a high-pressure capacity and durable construction. Look for features like a stable base, accurate gauge, and comfortable handle. Consider reputable brands and read reviews to ensure reliability and performance.

Why Is A Floor Pump Essential For Mountain Biking?

A floor pump is essential for maintaining optimal tire pressure. Proper tire pressure ensures better traction, control, and comfort on trails. It helps prevent flats and improves overall riding performance. A reliable floor pump makes inflating tires quick and easy.

What Features Should A Mountain Bike Floor Pump Have?

A mountain bike floor pump should have a high-pressure capacity, durable build, and stable base. Look for an accurate gauge and a comfortable handle. Additional features like dual valve compatibility and an air bleed button are also beneficial.

Conclusion

Choosing the right mountain bike floor pump is crucial for a smooth ride. A reliable pump ensures your tires are always ready. Invest in quality, and you’ll enjoy better performance and longevity. Remember to consider features like durability, ease of use, and compatibility.

Happy biking!

Tuesday, 12 November 2024

Best Clothes For Bike Riding: Ultimate Comfort and Style Guide

The best clothes for bike riding are moisture-wicking, breathable, and offer proper support. Opt for padded shorts and a fitted jersey.

Cycling demands specific attire to ensure comfort and efficiency. Moisture-wicking fabrics keep you dry by drawing sweat away from the skin. Breathable materials allow airflow, preventing overheating. Padded shorts provide cushioning to minimize saddle discomfort during long rides. A fitted jersey reduces wind resistance and often includes pockets for essentials.

Bright colors or reflective elements enhance visibility, promoting safety. Proper footwear with stiff soles improves pedaling efficiency. Gloves protect hands and improve grip, while sunglasses shield eyes from UV rays and debris. Dress appropriately to enhance your biking experience and performance.

Choosing The Right Fabric

Choosing the right fabric is crucial for a comfortable bike ride. The fabric affects your comfort and performance. Below, we explore the best fabric options for bike riding.

Breathable Materials

Breathable materials are essential for bike riders. These fabrics allow air circulation. They help to regulate body temperature. Some popular breathable materials include:

  • Mesh: Allows maximum airflow, keeping you cool.
  • Cotton blends: Soft and breathable, but not ideal for high-intensity rides.
  • Polyester: Lightweight and breathable, perfect for long rides.

Moisture-wicking Fabrics

Moisture-wicking fabrics pull sweat away from your skin. This keeps you dry and comfortable. These fabrics are ideal for intense bike rides. Some top moisture-wicking fabrics are:

  • Polypropylene: Excellent at moving sweat away, keeping you dry.
  • Merino wool: Natural fiber that wicks moisture and insulates.
  • Spandex: Stretchable and wicks moisture, great for flexibility.
Fabric Type Breathability Moisture-Wicking
Mesh High Low
Cotton Blends Medium Low
Polyester High High
Polypropylene Medium High
Merino Wool Medium High
Spandex Medium High
Best Clothes For Bike Riding: Ultimate Comfort and Style Guide

Credit: m.youtube.com

Ideal Fit For Biking

Choosing the right fit for bike riding clothes is crucial. It ensures comfort, safety, and performance. The ideal fit balances snugness and flexibility. This section will explore the best fit for biking clothes.

Snug Vs. Loose Fit

A snug fit is often preferred for biking. It reduces wind resistance and keeps clothes from snagging. Snug clothes also help in moisture-wicking, keeping you dry. They offer better aerodynamics, important for speed and long rides.

Loose fit clothes offer more airflow, keeping you cool. They are great for casual rides or short distances. Loose clothing can flap in the wind, which might be distracting. Ensure loose garments do not interfere with bike parts.

Importance Of Stretch

Stretchable fabrics are essential for bike riding clothes. They allow a full range of motion, crucial for pedaling and navigating. Stretch materials ensure that clothes return to their original shape. This maintains the snug fit even after many uses.

Clothes with stretch panels at key areas, like knees and elbows, enhance comfort. These panels prevent restriction and reduce chafing. Stretch fabrics also enhance durability, withstanding the rigors of biking activities.

Top Clothing Items

Finding the right clothes for bike riding can improve your comfort and performance. Wearing the best clothing items ensures you enjoy your ride. This guide highlights the top clothing items you should consider.

Cycling Jerseys

Cycling jerseys are essential for bike riders. They are designed to fit snugly to reduce wind resistance. Most jerseys are made from moisture-wicking fabric to keep you dry.

Here are some features to consider:

  • Breathability: Look for jerseys with breathable fabric to stay cool.
  • Pockets: Handy for carrying small items like snacks and tools.
  • Visibility: Bright colors or reflective elements enhance safety on the road.

Consider the following brands for quality cycling jerseys:

Brand Key Features
Castelli High performance, aerodynamic design
Rapha Stylish, durable, and comfortable
Gore Wear Great breathability and weather protection

Bike Shorts

Bike shorts are another must-have for cyclists. They provide padding to reduce discomfort during long rides. Quality shorts also reduce chafing.

Consider these features when selecting bike shorts:

  • Padding: Look for shorts with high-density padding for better comfort.
  • Material: Choose shorts made from stretchy, moisture-wicking fabric.
  • Fit: Ensure the shorts fit well and don’t ride up.

Top brands for bike shorts include:

  1. Assos: Known for excellent comfort and fit.
  2. Louis Garneau: Offers a range of padded shorts.
  3. Pearl Izumi: Provides durable and well-padded options.
Best Clothes For Bike Riding: Ultimate Comfort and Style Guide

Credit: www.rei.com

Seasonal Gear

Choosing the right clothes for bike riding can make a big difference. Whether it's summer or winter, seasonal gear helps you stay comfortable and safe. Let's dive into the essentials for each season.

Summer Attire

Summer riding requires light and breathable clothes. Lightweight fabrics keep you cool and wick away sweat.

  • Moisture-wicking jerseys: These shirts pull sweat away from your skin.
  • Shorts with padding: Cushioned shorts reduce discomfort during long rides.
  • Ventilated helmets: Helmets with air vents keep your head cool.

It's crucial to protect your skin from the sun. Wear UV-protective sleeves and apply sunscreen.

Item Feature
Jersey Moisture-wicking
Shorts Padding
Helmet Ventilated
Sleeves UV-protective

Winter Essentials

Winter riding needs warmth and protection from the cold. Layering is key to staying warm without overheating.

  1. Base layer: A thermal shirt keeps your body heat in.
  2. Insulated jacket: This outer layer traps warmth and blocks wind.
  3. Thermal tights: These pants keep your legs warm.
  4. Windproof gloves: Gloves protect your hands from the cold wind.
  5. Skull cap: Wear it under your helmet to keep your head warm.

Don't forget to wear reflective gear. Shorter days mean you need to be visible to others.

Item Feature
Base Layer Thermal
Jacket Insulated
Tights Thermal
Gloves Windproof
Skull Cap Warm
Reflective Gear Visible

Safety Considerations

Best Clothes For Bike Riding: Safety Considerations

Bike riding is fun but safety is crucial. Wearing the right clothes can prevent accidents. Let's explore the best safety considerations.

High-visibility Clothing

Wearing high-visibility clothing helps drivers see you. Bright colors like neon yellow, orange, and green work best.

Consider clothes with reflective strips. These shine in car lights. Reflective strips are important for night riding.

Color Visibility Level
Neon Yellow High
Neon Orange High
Neon Green High
Reflective Strips Very High

Protective Gear

Protective gear saves lives. Always wear a helmet. A helmet protects your head during falls. Make sure it fits well.

Padded gloves protect hands and provide better grip. Wear elbow and knee pads for extra safety. These pads prevent serious injuries.

  • Helmet
  • Padded Gloves
  • Elbow Pads
  • Knee Pads

Accessorizing For Comfort

Bike riding is not only about the bike; it’s also about the right accessories. Accessorizing for comfort can make your ride more enjoyable. The right accessories can help you ride longer and feel better.

Gloves And Mitts

Gloves and mitts are essential for a comfortable ride. They provide grip and protect your hands from blisters. They also help absorb shocks from the road. Here are some features to look for in gloves and mitts:

  • Padded palms for better shock absorption
  • Breathable material to keep your hands cool
  • Adjustable straps for a secure fit

Choose gloves and mitts that fit well and feel comfortable. Avoid gloves that are too tight or too loose.

Cycling Socks

Cycling socks may seem like a small detail, but they make a big difference. They keep your feet dry and comfortable. Here are some features to look for in cycling socks:

  • Moisture-wicking material to keep your feet dry
  • Cushioned soles for added comfort
  • Compression fit to improve circulation

Choose cycling socks that are specifically designed for biking. Regular socks may not provide the same level of comfort and support.

Accessory Key Features
Gloves and Mitts
  • Padded palms
  • Breathable material
  • Adjustable straps
Cycling Socks
  • Moisture-wicking material
  • Cushioned soles
  • Compression fit

Footwear For Cyclists

Choosing the right footwear for cycling can make a world of difference. The correct shoes offer better comfort, improved performance, and enhanced safety. Here's a guide to help you pick the best shoes for your ride.

Clipless Shoes

Clipless shoes are designed to attach directly to the pedals. This provides a more efficient power transfer from your legs to the bike. They feature special cleats on the soles which lock into the pedal mechanism.

Here are some key benefits:

  • Increased pedaling efficiency
  • Enhanced control and stability
  • Better performance on long rides

Clipless shoes come in various styles:

Type Best For Features
Road Bike Shoes Road Cycling Stiff soles, lightweight
Mountain Bike Shoes Off-road Cycling Durable, rugged
Touring Shoes Long Rides Comfortable, versatile

Flat Pedal Shoes

Flat pedal shoes are designed for use with flat pedals. These shoes provide great freedom and versatility. They are ideal for casual riding and off-road biking.

Here are some key benefits:

  • Easy to use, no special pedals needed
  • Great for beginners and casual cyclists
  • Excellent for mountain biking and trick riding

Flat pedal shoes come in various styles:

Type Best For Features
Skate Shoes Urban Riding Flexible, grippy soles
Mountain Bike Shoes Off-road Cycling Durable, protective
Casual Shoes Everyday Rides Comfortable, versatile

Choosing the right shoes enhances your cycling experience. Make sure to pick the style that suits your riding needs best.

Sustainable Choices

Choosing the best clothes for bike riding is essential. Sustainable choices can make a big difference. They help protect our planet. Sustainable clothes are also comfortable and durable. This section explores sustainable choices for bike riding apparel.

Eco-friendly Fabrics

Eco-friendly fabrics are great for bike riding. They are made from natural materials. This includes organic cotton, bamboo, and hemp. These fabrics are gentle on your skin. They also reduce harm to the environment. Let's look at their benefits:

  • Organic Cotton: Soft, breathable, and hypoallergenic.
  • Bamboo: Moisture-wicking, antibacterial, and temperature-regulating.
  • Hemp: Durable, strong, and naturally resistant to mold.

Durable And Long-lasting Options

Durability is key for bike riding clothes. You need them to last for many rides. Sustainable fabrics are also long-lasting. They can handle wear and tear. Here are some durable options:

Fabric Benefits
Recycled Polyester Strong, quick-drying, and reduces plastic waste.
Wool Warm, moisture-wicking, and naturally odor-resistant.

Choosing durable options reduces waste. You won't need to replace them often. This saves money and helps the environment.

Best Clothes For Bike Riding: Ultimate Comfort and Style Guide

Credit: road.cc

Frequently Asked Questions

What Are The Best Clothes For Bike Riding?

The best clothes for bike riding include moisture-wicking jerseys, padded shorts, and breathable jackets. These materials keep you dry and comfortable.

Why Should Cyclists Wear Padded Shorts?

Padded shorts reduce friction and provide cushioning. This helps in preventing saddle sores and enhances comfort during long rides.

Are Moisture-wicking Clothes Essential For Cycling?

Yes, moisture-wicking clothes are essential. They help in keeping sweat away from your skin, ensuring you stay dry and comfortable.

What Type Of Jacket Is Best For Bike Riding?

A lightweight, breathable, and waterproof jacket is best. It protects you from wind and rain without overheating.

Conclusion

Choosing the right clothes for bike riding enhances comfort and performance. Prioritize breathable, moisture-wicking fabrics. Don't forget visibility and safety. With the right gear, your rides will be enjoyable and efficient. Happy biking!

Monday, 11 November 2024

How To Change A Bike Tire And Fix A Flat: Expert Tips

To change a bike tire and fix a flat, remove the wheel and take off the damaged tire. Replace it with a new one, then inflate the tire.

A flat tire can ruin your cycling experience. Knowing how to change a bike tire and fix a flat is essential for every cyclist. It’s a simple process that saves time and money. Start by removing the wheel from the bike.

Use tire levers to take off the damaged tire. Check the inner tube and rim for any sharp objects. Install a new or patched tube and put the new tire in place. Inflate the tire to the recommended pressure. Reattach the wheel to your bike and ensure everything is secure. This skill helps you get back on the road quickly.

How To Change A Bike Tire And Fix A Flat: Expert Tips

Credit: www.rei.com

Essential Tools

Changing a bike tire or fixing a flat can seem daunting. But with the right tools, it becomes a simple task. Below, we dive into the essential tools needed for this job.

Must-have Items

To get started, you need a few must-have items. These tools will make the job easier and faster:

  • Tire Levers: These help you remove the tire from the rim.
  • Spare Tube: A new tube is essential if the old one is damaged.
  • Bike Pump: This inflates your tire once the tube is replaced.
  • Patch Kit: Use this to repair small punctures in the tube.
  • Wrench: Needed if your bike has bolt-on wheels.

Optional Accessories

While the above tools are necessary, some optional accessories can make the process smoother:

  • CO2 Inflator: This tool inflates tires quickly and easily.
  • Gloves: Keep your hands clean and protected.
  • Portable Workstand: Holds your bike steady while you work.
  • Multi-tool: Handy for any unexpected adjustments.
Must-Have Items Optional Accessories
Tire Levers CO2 Inflator
Spare Tube Gloves
Bike Pump Portable Workstand
Patch Kit Multi-tool
Wrench

Having these tools and accessories ensures you are prepared for any flat tire situation. This makes your ride more enjoyable and worry-free.

How To Change A Bike Tire And Fix A Flat: Expert Tips

Credit: www.rei.com

Preparing Your Bike

Before changing a bike tire or fixing a flat, you must prepare your bike. This preparation ensures a smoother process and avoids any damage. Follow these steps to make sure your bike is ready.

Safety Measures

  • Wear gloves to protect your hands.
  • Use eye protection to avoid debris.
  • Make sure your bike is on stable ground.

Bike Positioning

Proper bike positioning makes tire changes easier and safer. Follow these steps:

  1. Turn the bike upside down. Rest it on the seat and handlebars.
  2. Ensure the bike is stable. Use a bike stand if you have one.
  3. Remove any items from the bike. This includes water bottles and bags.
Step Action
1 Wear gloves and eye protection.
2 Turn the bike upside down.
3 Ensure bike stability.
4 Remove any items from the bike.

Following these steps ensures your bike is ready for a tire change or flat fix.

Removing The Wheel

Changing a bike tire starts with removing the wheel. This step is crucial. Follow the right steps to avoid damaging your bike. Here’s how to remove the wheel easily.

Quick Release Mechanism

Many bikes have a quick release mechanism. This makes removing the wheel fast and simple. Follow these steps:

  1. First, flip your bike upside down or use a bike stand.
  2. Locate the quick release lever on the center of the wheel.
  3. Open the lever by pulling it outward.
  4. Loosen the nut on the opposite side by hand.
  5. Remove the wheel by gently pulling it out of the frame.

Remember to keep the quick release lever and nut in a safe place. You will need them for reinstallation.

Bolt-on Axle

Some bikes use a bolt-on axle instead of a quick release mechanism. This type requires a wrench. Follow these steps:

  1. First, flip your bike upside down or use a bike stand.
  2. Use a suitable wrench to loosen the nuts on both sides of the axle.
  3. Turn the nuts counterclockwise to loosen them.
  4. Once loose, remove the nuts completely and set them aside.
  5. Gently pull the wheel out of the frame.

Keep the nuts safe. You will need them to reattach the wheel.

Whether your bike has a quick release mechanism or a bolt-on axle, removing the wheel is simple. Just follow the correct steps.

Taking Off The Tire

Changing a bike tire can seem difficult at first. But with the right steps, you can do it easily. Follow this guide to learn how to take off your bike tire and fix a flat. You will need some tools, like tire levers and a pump. Let's get started!

Deflating The Tire

First, you need to deflate the tire. This step is important for your safety. Find the valve on your tire. Press the valve to let the air out. Make sure the tire is completely flat before you move to the next step.

Using Tire Levers

Next, you need to use tire levers. These small tools help you remove the tire from the rim. Insert the first tire lever under the edge of the tire. Push down to lift the tire over the rim. Repeat this with the second tire lever about an inch away. Move the levers along the rim to fully remove the tire.

Here's a quick summary:

  • Insert the first tire lever under the tire edge.
  • Push down to lift the tire over the rim.
  • Repeat with the second tire lever.
  • Slide the levers along the rim to remove the tire.

Now, your tire is off! You are ready for the next steps in fixing your flat.

Inspecting For Damage

Before you fix a flat tire, inspect it for damage. This step ensures you find the problem and avoid future issues. Below are the steps to examine both the tire and the tube.

Tire Examination

First, take the tire off the bike. Look for any sharp objects stuck in the tire. Use a flashlight to see better. Check the tread for cuts or tears. Run your fingers along the inside of the tire. Feel for any small objects or rough spots.

  • Remove the tire from the bike
  • Use a flashlight to inspect the tire
  • Check the tread for cuts or tears
  • Run fingers inside the tire to feel for sharp objects

Inspect the sidewalls. Check for cracks or bulges. A damaged sidewall can cause another flat. If you find any damage, replace the tire.

  • Inspect sidewalls for cracks or bulges
  • Replace the tire if damage is found

Tube Inspection

Next, examine the inner tube. Inflate the tube slightly. Listen for any hissing sounds. This can help you find small holes or punctures. Check the entire tube surface for visible damage.

  1. Inflate the tube slightly
  2. Listen for hissing sounds
  3. Check the entire tube for damage

If you find a hole, mark it with a pen. Use a bowl of water to find small leaks. Submerge parts of the tube and look for bubbles.

  • Mark the hole with a pen
  • Use a bowl of water to find small leaks
  • Look for bubbles to spot leaks

Check the valve as well. Ensure it is not bent or damaged. A faulty valve can also cause flats. Replace the tube if you find any damage.

  • Inspect the valve for bends or damage
  • Replace the tube if damage is found

Patching The Tube

Fixing a flat bike tire is a skill every cyclist needs. Knowing how to patch a tube can save time and money. This guide will help you master patching your bike tube.

Locating The Puncture

First, find the hole in the tube. Inflate the tube slightly and listen for escaping air. If you can't hear it, submerge the tube in water. Look for bubbles to find the puncture. Mark the spot with a pen or chalk.

Applying The Patch

Now, prepare the area around the hole. Use sandpaper to roughen the surface. This helps the patch stick better. Apply a thin layer of rubber cement around the hole. Let it dry for a few minutes.

Peel the backing off your patch. Place it firmly over the hole. Press down hard to make sure it sticks. Wait a few minutes for the patch to set. Inflate the tube again to check for leaks.

Step Description
1 Find the puncture by listening or using water.
2 Mark the hole with a pen or chalk.
3 Roughen the area around the hole with sandpaper.
4 Apply rubber cement and let it dry.
5 Place the patch over the hole and press firmly.
6 Inflate the tube to check for leaks.

Once the tube is patched, reassemble your bike tire. You are now ready to ride again!

Installing The New Tire

Changing a bike tire can seem tricky, but it's simple with guidance. This section will walk you through the steps to install the new tire correctly.

Seating The Tire

Start by placing the tire on the rim. Ensure the bead of the tire sits evenly around the rim. Use your hands to press the tire into place. Check that the tire is centered. If not, adjust it by squeezing and moving the tire around the rim. This step is crucial to avoid pinching the tube.

Inflating To Proper Pressure

Before inflating, double-check that the tire is seated well. Inflate the tube slowly. Use a bike pump with a pressure gauge. Refer to the sidewall of your tire for the recommended PSI.

Pressure Type PSI Range
Road Bike 80-130 PSI
Mountain Bike 30-50 PSI
  • Check the tire pressure often during inflation.
  • Make sure the tire is evenly inflated.
  • Listen for any hissing sounds that indicate a leak.

Once the tire reaches the proper pressure, your bike is ready to ride. Reattach the wheel to the bike frame. Tighten the quick-release lever or axle nuts. Spin the wheel to ensure it's properly seated and secure.

How To Change A Bike Tire And Fix A Flat: Expert Tips

Credit: www.liv-cycling.com

Reattaching The Wheel

Once you’ve fixed the flat tire, it’s time to reattach the wheel. This step is crucial to ensure your bike is safe and ready to ride. Follow these guidelines to make sure everything is aligned and secure.

Aligning The Wheel

First, you need to align the wheel with the bike frame. If you have a front wheel, place it back into the fork. For a rear wheel, ensure the chain is correctly placed on the gears.

Make sure the wheel is centered between the fork or frame. Spin the wheel to check if it rotates smoothly. If it wobbles, adjust its position until it spins evenly.

Securing The Axle

Once the wheel is aligned, the next step is to secure the axle. Use the quick release lever or axle nuts to tighten the wheel in place. For quick release levers, make sure they are fully closed and tight. For axle nuts, use a wrench to ensure they are snug but not overly tight.

Double-check the security of the axle before riding. A loose wheel can be dangerous and cause accidents. Ensure the wheel is firmly attached to the bike frame.

Step Description
1 Align the wheel with the frame
2 Center the wheel and check for wobbling
3 Secure the axle using quick release or axle nuts
4 Double-check the wheel's security

By following these steps, you can ensure your bike wheel is properly reattached and secure, allowing for a safe and smooth ride.

Final Checks

After successfully changing your bike tire and fixing the flat, it’s crucial to perform some final checks. These checks ensure your bike is safe and ready to ride. Pay attention to details to avoid future issues. Below are the essential steps for final checks.

Brake Adjustment

Ensuring your brakes are properly adjusted is vital. Poor brake adjustments can lead to accidents. Follow these steps:

  • Spin the wheel to make sure it rotates freely.
  • Check if the brake pads touch the rim evenly.
  • If the pads are not aligned, use an Allen wrench to adjust them.
  • Ensure the brake lever feels firm and responsive.

Test Ride

Before heading out for a long ride, perform a test ride. This step confirms everything is in working order. Here's a quick checklist:

  1. Ride your bike in a safe area.
  2. Test the brakes by stopping quickly.
  3. Check if the tire feels secure and stable.
  4. Listen for any unusual noises.
  5. Make sure the bike handles well.

A successful test ride means your bike is ready for the road. Always keep an eye on your bike's performance.

Pro Tips

Changing a bike tire and fixing a flat can be tricky. Pro tips can make it easier. Follow these tips to avoid mistakes and keep your tires healthy.

Avoiding Common Mistakes

Avoiding common mistakes saves time and effort. Here are some tips:

  • Check for sharp objects: Remove nails or glass before installing a new tube.
  • Use proper tools: Tire levers make removing the tire easier.
  • Don't overinflate: Follow the tire's recommended pressure to avoid bursting.
  • Inspect the tire bead: Ensure the bead is seated correctly to prevent pinching.
  • Practice makes perfect: Try changing a tire at home before hitting the road.

Maintaining Tire Health

Keeping your tires in good shape prevents flats and extends their life. Here are some simple tips:

  1. Check tire pressure regularly. Under-inflation can cause flats.
  2. Inspect tires for wear and tear. Replace them if needed.
  3. Clean tires after rides. Remove debris that could cause punctures.
  4. Store bikes properly. Avoid exposing them to extreme temperatures.
  5. Rotate tires occasionally. This ensures even wear.

Use this table to remember key points:

Task Frequency
Check Tire Pressure Weekly
Inspect for Wear Monthly
Clean Tires After Every Ride
Rotate Tires Quarterly

Frequently Asked Questions

How Do You Change A Bike Tire?

To change a bike tire, remove the wheel, deflate the tire, and use tire levers to remove it. Place the new tire onto the rim, inflate it to the recommended pressure, and reattach the wheel.

What Tools Are Needed To Fix A Flat Bike Tire?

You'll need tire levers, a spare tube or patch kit, a pump, and possibly a wrench. These tools help you remove the tire, fix the puncture, and re-inflate the tire.

How Long Does It Take To Change A Bike Tire?

Changing a bike tire typically takes about 15 to 30 minutes. The time can vary depending on your experience and the tools available.

Can You Patch A Bike Tire Without Removing It?

Yes, you can patch a bike tire without removing it. Deflate the tire, locate the puncture, and apply the patch. However, removing the tire ensures a more thorough repair.

Conclusion

Changing a bike tire and fixing a flat is simpler than it seems. With the right tools and steps, you can easily handle it yourself. Regularly check your tires to prevent future flats. Now, you're ready for a smooth and safe ride.

Enjoy the freedom of biking without the worry of flats!

Sunday, 10 November 2024

Is WD 40 Good for Bike Chain? The Ultimate Guide

WD-40 is not ideal for bike chains. It can remove essential lubricants, leading to quicker wear and tear.

Many cyclists wonder about the best way to maintain their bike chains. Proper lubrication is crucial for smooth rides and prolonged chain life. While WD-40 is a popular household product known for its rust-prevention and lubrication properties, it’s not the best choice for bike chains.

This product can strip away essential lubricants, causing the chain to wear out faster. Instead, specific bike chain lubricants are formulated to handle the unique demands of cycling. These products provide long-lasting lubrication and protection against dirt and debris. Regularly cleaning and lubricating your bike chain with the right products ensures optimal performance and longevity.

What Is Wd-40?

WD-40 is a popular multi-use product. It is known for its lubricating and cleaning properties. Many people have a can of WD-40 at home or in the garage. But what exactly is it?

Composition

WD-40 stands for "Water Displacement, 40th formula." It was created to prevent rust and corrosion. The main ingredients include:

  • Mineral oil
  • Aliphatic hydrocarbons
  • Carbon dioxide

The exact formula is a secret. The combination of these ingredients makes WD-40 effective for many tasks.

Common Uses

WD-40 is a versatile product. Here are some common uses:

Use Description
Lubrication Keeps moving parts working smoothly.
Rust Prevention Protects metal from rust and corrosion.
Cleaning Removes grease, grime, and adhesives.

People use WD-40 for many other tasks too. It can loosen stuck bolts, remove crayon marks, and more.

Wd-40 And Bike Chains

WD-40 and Bike Chains

Many cyclists ask if WD-40 is good for bike chains. WD-40 is a popular product. It is known for its ability to lubricate and protect. But is it the best choice for your bike chain? Let's explore this in detail.

Effects On Lubrication

WD-40 can help loosen a stuck chain. It can remove grime and dirt. But it is not the best lubricant. Bike chains need special oil. This oil stays on the chain for a long time.

WD-40 is a water displacer. It can make your chain dry fast. This can leave your chain without enough lubrication. A dry chain can wear out quickly. It may also cause more friction. This makes biking harder.

Impact On Chain Longevity

Using WD-40 can affect your chain's life. Chains need to stay well-lubricated. WD-40 can clean but not lubricate well. A well-lubricated chain lasts longer. It runs smoother.

WD-40 can attract dust. Dust can cause more wear and tear. This reduces the life of your chain. A special bike lubricant does not attract dust. It keeps your chain running for a long time.

WD-40 Bike Lubricant
Cleans well Lubricates well
Dries fast Stays longer
Attracts dust Repels dust

It is clear that WD-40 is not ideal for bike chains. Special bike lubricants are better. They ensure your bike runs smoothly. They also extend the life of your chain.

Benefits Of Using Wd-40

WD-40 is a popular choice for maintaining bike chains. It has several benefits that make it a preferred option for many cyclists.

Ease Of Application

Applying WD-40 to your bike chain is simple. The product comes in an easy-to-use spray can. This allows for quick and precise application. You can reach all parts of the chain without any hassle. Simply spray it on, and you are good to go.

WD-40 also has a nozzle for targeted application. This ensures that the lubricant goes exactly where you need it. No messy spills or wasted product.

Availability

WD-40 is widely available in many stores. You can find it in hardware stores, supermarkets, and online. It's easy to purchase and have on hand for bike maintenance.

Its availability makes it a convenient choice for cyclists. You won't have to search far to find it, saving you time and effort. Many stores stock it, making it accessible for everyone.

Benefit Description
Ease of Application Quick and precise application with a spray can.
Availability Available in many stores and online.
  • Simple to use
  • Targets specific areas
  • Easy to purchase
Is WD 40 Good for Bike Chain? The Ultimate Guide

Credit: wd40.in

Drawbacks Of Wd-40

WD-40 can strip essential lubricants from your bike chain, leading to increased wear and tear. Frequent use may attract dirt and grime, causing further damage.

WD-40 is a popular multi-use product. Many people use it for various applications. But using WD-40 on a bike chain can have several drawbacks. Below, we discuss the potential damage and inadequate protection.

Potential Damage

WD-40 can cause potential damage to your bike chain. This product is a solvent, not a lubricant. It can strip essential lubricants from the chain. Removing these lubricants increases wear and tear. Over time, this leads to a shorter chain lifespan.
Issue Description
Lubricant Stripping WD-40 removes necessary oils from the chain.
Increased Wear Without proper lubrication, chains wear out faster.
Shorter Lifespan Regular use of WD-40 can reduce chain life.

Inadequate Protection

WD-40 offers inadequate protection for bike chains. It does not provide the necessary lubrication for smooth operation. This leads to increased friction. More friction means more effort is needed to pedal. It also makes the chain noisier.
  • Low Lubrication: WD-40 lacks the necessary oils for smooth chain movement.
  • Increased Friction: Less lubrication results in more friction between chain links.
  • Noise Issues: A poorly lubricated chain tends to be noisier.
Proper bike chain lubricants are specifically designed for this purpose. They provide better protection and performance. This ensures your bike chain lasts longer and works more efficiently. ```

Alternatives To Wd-40

WD-40 is a popular choice for many bike owners. But it's not the best for bike chains. There are better alternatives for lubricating your bike chain. Here are some options.

Specialized Bike Lubricants

Specialized bike lubricants are made for bike chains. They offer better protection and performance. They come in two types:

  • Dry Lubricants: Best for dry and dusty conditions. They leave a dry film that repels dirt.
  • Wet Lubricants: Ideal for wet and muddy conditions. They stay on the chain longer and prevent rust.

Using specialized lubricants can extend the life of your chain. They also improve your bike's performance.

Household Lubricants

Some household lubricants can be used on bike chains. They may not be as effective, but they work in a pinch. Here are a few options:

  • Olive Oil: An easy-to-find option. It provides temporary lubrication but attracts dirt.
  • 3-in-1 Oil: A versatile lubricant that can work on bike chains. It's not as durable as specialized lubricants.
  • Petroleum Jelly: Can be used as a temporary fix. It provides some lubrication and protection against rust.

These household options are handy. But they are not substitutes for specialized bike lubricants.

Is WD 40 Good for Bike Chain? The Ultimate Guide

Credit: www.wd40.com

Proper Bike Chain Maintenance

Maintaining your bike chain is crucial for a smooth ride. A well-maintained bike chain ensures longevity and optimal performance. Understanding how to clean and lubricate your bike chain will keep your rides trouble-free.

Cleaning Tips

Keeping your bike chain clean is essential. Dirt and debris can cause wear and tear. Here are some easy cleaning tips:

  • Use a soft brush to remove dirt.
  • Apply a degreaser to the chain.
  • Let the degreaser sit for 10 minutes.
  • Rinse the chain with water.
  • Dry the chain with a clean cloth.

Repeat these steps regularly to keep your bike chain clean.

Lubrication Best Practices

Proper lubrication is key to a smooth bike chain. Lubrication reduces friction and prevents rust. Follow these best practices for lubricating your bike chain:

  1. Choose a lubricant suited for your riding conditions.
  2. Apply the lubricant to the chain links.
  3. Ensure even coverage by rotating the pedals.
  4. Wipe off excess lubricant with a cloth.

Lubricate your bike chain every few rides for the best performance.

Steps Cleaning Lubrication
Step 1 Use a soft brush Choose a suitable lubricant
Step 2 Apply a degreaser Apply lubricant to chain links
Step 3 Rinse and dry Rotate pedals for even coverage
Step 4 Repeat regularly Wipe off excess lubricant

By following these cleaning and lubrication tips, you can ensure your bike chain remains in top condition.

Is WD 40 Good for Bike Chain? The Ultimate Guide

Credit: www.youtube.com

Frequently Asked Questions

Can You Use Wd-40 On A Bike Chain?

WD-40 can be used on a bike chain, but it's not ideal. It's more of a solvent than a lubricant, and it may wash away the necessary grease. Use a specific bike chain lubricant for better performance and longevity.

What Are The Downsides Of Using Wd-40?

Using WD-40 on a bike chain can remove essential lubricants. This may lead to increased wear and tear. It's better to use a dedicated bike chain lubricant to ensure proper care and maintenance.

How Often Should You Lubricate A Bike Chain?

Lubricate your bike chain every 100-150 miles or every two weeks. Regular lubrication ensures smooth operation and extends the chain's life. Clean the chain before applying new lubricant for optimal performance.

What Is The Best Lubricant For Bike Chains?

The best lubricant for bike chains is a dedicated bike chain lube. These are designed to handle the specific conditions a bike chain faces. Options include wet lubes for wet conditions and dry lubes for dry conditions.

Conclusion

Using WD-40 on your bike chain has pros and cons. It cleans effectively but lacks long-term lubrication. For best results, use a proper bike chain lubricant. Regular maintenance ensures a smooth ride and extends your bike's lifespan. Always weigh the options and choose what's best for your bike.

Saturday, 9 November 2024

Bike Chain Cleaning Kit: Ultimate Guide for a Smooth Ride

A Bike Chain Cleaning Kit helps maintain your bike's efficiency. It includes essential tools for thorough cleaning and lubrication.

Maintaining a clean bike chain is crucial for smooth rides and longevity. Dirt and grime accumulation can hinder performance and cause wear. A Bike Chain Cleaning Kit offers an effective solution. These kits generally include brushes, degreasers, and lubricants. They are designed to remove stubborn dirt and ensure optimal chain function.

Regular use can prevent rust and extend the life of your bike's chain. Investing in a good cleaning kit saves time and enhances riding experience. Keep your bike chain in top condition with the right tools. Enjoy a smoother, more efficient ride every time.

Bike Chain Cleaning Kit: Ultimate Guide for a Smooth Ride

Credit: www.amazon.com

Types Of Bike Chain Cleaning Kits

Bike chain cleaning kits come in various types. Knowing these types helps you choose the right one. Your bike chain needs regular cleaning for smooth rides. Below, we'll explore two main types: manual and electric cleaning kits.

Manual Cleaning Kits

Manual cleaning kits require your effort. They are simple and effective. These kits usually include:

  • A chain scrubber tool
  • Brushes of different sizes
  • Degreaser solution

Using manual kits, you have full control. Scrub the chain, rinse, and dry. These kits are affordable and easy to use. Great for quick cleanups and regular maintenance. Manual kits suit all types of bikes.

Electric Cleaning Kits

Electric cleaning kits use power to clean. They are more advanced. These kits often include:

  • An electric chain cleaner device
  • Built-in brushes and scrubbing pads
  • Automatic degreaser spray system

Electric kits make the job easier. Just place the chain inside and turn it on. The machine does the work. These kits are faster and more efficient. Suitable for heavy-duty cleaning. Ideal for avid bikers and professionals.

Essential Tools In A Cleaning Kit

Maintaining your bike chain is crucial. A clean chain ensures smooth rides and long-lasting performance. A good bike chain cleaning kit includes specific tools for thorough cleaning.

Brushes And Scrapers

Brushes and scrapers are vital tools. They help remove dirt and grime from the chain. A typical cleaning kit has various brushes:

  • Detailing brushes: Reach tight spots.
  • Scrapers: Remove built-up debris.
  • Rotating brushes: Clean multiple sides of the chain at once.

Each tool has a specific function. Using them ensures a spotless chain.

Degreasers And Lubricants

Degreasers break down stubborn grease and grime. They are essential for a deep clean. Common degreasers include:

  • Spray degreasers: Easy to apply and effective.
  • Biodegradable options: Eco-friendly and safe for the environment.

Lubricants are also crucial. They ensure the chain runs smoothly post-cleaning. Types of lubricants include:

  • Dry lubricants: Ideal for dry, dusty conditions.
  • Wet lubricants: Perfect for wet, muddy environments.

Using the right degreasers and lubricants keeps your chain in top condition.

Tool Function
Detailing Brushes Reach tight spots
Scrapers Remove built-up debris
Rotating Brushes Clean multiple sides of the chain
Spray Degreasers Break down grease easily
Biodegradable Degreasers Eco-friendly cleaning
Dry Lubricants For dry, dusty conditions
Wet Lubricants For wet, muddy environments

Step-by-step Cleaning Process

Keeping your bike chain clean ensures a smooth ride and extends its life. Follow this simple step-by-step guide to use your Bike Chain Cleaning Kit efficiently.

Preparation And Safety

  • Gather Your Tools: Bike Chain Cleaning Kit, gloves, and a cloth.
  • Wear Gloves: Protect your hands from grease and chemicals.
  • Choose a Well-Ventilated Area: Clean your bike in an open space.

Cleaning The Chain

  1. Position the Bike: Use a bike stand to keep it steady.
  2. Open the Chain Cleaner: Place it around the chain.
  3. Add Cleaning Solution: Pour it into the cleaner reservoir.
  4. Rotate the Pedals: Turn pedals backward to move the chain.
  5. Scrub the Chain: Brushes in the cleaner will scrub off dirt.

Rinsing And Drying

  • Rinse the Chain: Use water to remove cleaning solution.
  • Dry with a Cloth: Wipe the chain thoroughly with a dry cloth.
  • Lubricate the Chain: Apply lubricant to keep it smooth.

Following these steps ensures your bike chain stays in top condition, providing a smoother and more efficient ride.

Bike Chain Cleaning Kit: Ultimate Guide for a Smooth Ride

Credit: www.parktool.com

Lubrication Tips

Taking care of your bike chain is crucial. Proper lubrication ensures smooth rides and extends your bike's life. Let's explore some key tips to keep your bike chain in top shape.

Choosing The Right Lubricant

Selecting the correct lubricant is essential. Different conditions need different lubes. Here are some common options:

  • Dry Lubes: Ideal for dry, dusty conditions.
  • Wet Lubes: Best for wet, muddy environments.
  • All-Purpose Lubes: Suitable for varied weather conditions.

Using the wrong lubricant can lead to poor performance. Always match the lubricant to your riding conditions.

Proper Application Techniques

Applying lubricant correctly is as important as choosing the right one. Follow these steps for optimal results:

  1. Clean the chain thoroughly before application.
  2. Apply lubricant to the inside of the chain.
  3. Rotate the pedals backwards to distribute the lube evenly.
  4. Wipe off excess lubricant with a clean cloth.

Proper application prevents dirt buildup and ensures smooth gear shifts. Regular maintenance will keep your bike running smoothly.

Lubricant Type Best For
Dry Lubes Dry, dusty conditions
Wet Lubes Wet, muddy environments
All-Purpose Lubes Varied weather conditions

Common Mistakes To Avoid

Using a bike chain cleaning kit can be simple. However, some mistakes can ruin your bike chain. Here are the most common mistakes to avoid.

Over-lubricating

Over-lubricating your bike chain can attract dirt. This dirt can wear down your chain quickly. Use only a small amount of lubricant. Wipe off any excess with a clean cloth. This keeps your chain clean and smooth.

Using Harsh Chemicals

Harsh chemicals can damage your bike chain. Avoid bleach, ammonia, or strong degreasers. These can corrode the metal. Instead, use a bike-specific cleaner. It is designed to be gentle on your chain. Always rinse off any cleaner thoroughly with water.

Common Mistake Why It's Bad Better Option
Over-Lubricating Attracts dirt and grime Use a small amount, wipe off excess
Using Harsh Chemicals Corrodes metal, damages chain Use bike-specific cleaners
Bike Chain Cleaning Kit: Ultimate Guide for a Smooth Ride

Credit: m.youtube.com

Maintaining Your Cleaning Kit

Regular maintenance of your bike chain cleaning kit ensures it works efficiently. A clean kit means your bike chain stays in top shape. Let's dive into how to keep your tools and kit in great condition.

Cleaning The Tools

It's crucial to clean your tools after every use. Dirty tools can transfer grime back to your bike chain. Follow these simple steps to clean your tools:

  1. Disassemble the cleaning kit.
  2. Rinse each part with warm, soapy water.
  3. Use an old toothbrush to scrub hard-to-reach areas.
  4. Rinse thoroughly with clean water.
  5. Dry each part completely before storing.

Storage Tips

Proper storage extends the life of your cleaning kit. Here are some tips to store it effectively:

  • Keep the kit in a dry place to prevent rust.
  • Store tools in a box to avoid losing small parts.
  • Label the storage box for easy identification.
  • Avoid direct sunlight to prevent material degradation.
Storage Tips Benefits
Keep in a dry place Prevents rust
Store tools in a box Avoids losing parts
Label the storage box Easy identification
Avoid direct sunlight Prevents degradation

Frequently Asked Questions

How Often Should I Clean My Bike Chain?

It's recommended to clean your bike chain every 100-200 miles. This keeps it free from dirt and grime, ensuring smooth performance.

What Tools Are In A Bike Chain Cleaning Kit?

A bike chain cleaning kit typically includes a chain scrubber, degreaser, and brushes. These tools help in effectively cleaning and maintaining your bike chain.

Can A Dirty Bike Chain Affect Performance?

Yes, a dirty bike chain can cause poor shifting and increased wear. Regular cleaning ensures optimal performance and longevity of your bike components.

How Do I Use A Bike Chain Cleaning Kit?

First, apply degreaser to the chain. Use the scrubber and brushes to clean thoroughly. Rinse and dry before lubricating.

Conclusion

Keeping your bike chain clean ensures a smoother ride and extends its lifespan. A quality bike chain cleaning kit simplifies maintenance. Regular use prevents rust and improves performance. Invest in a reliable kit for hassle-free upkeep. Enjoy a better cycling experience with a clean, well-maintained bike chain.

Kmc X10 10 Speed Chain: Ultimate Performance for Cyclists

The KMC X10 10 Speed Chain is a durable, lightweight chain designed for smooth shifting and long-lasting performan...