Wednesday, 20 November 2024

Road Bike Tire Sizing Chart: Find Your Perfect Fit Today!

Road bike tire sizing charts help cyclists select the right tire for their bike. Proper sizing ensures optimal performance and safety.

Choosing the right road bike tire size is crucial for a smooth and efficient ride. A tire sizing chart helps you match your bike’s specifications with the correct tire dimensions. Understanding tire measurements can improve your biking experience, making it safer and more enjoyable.

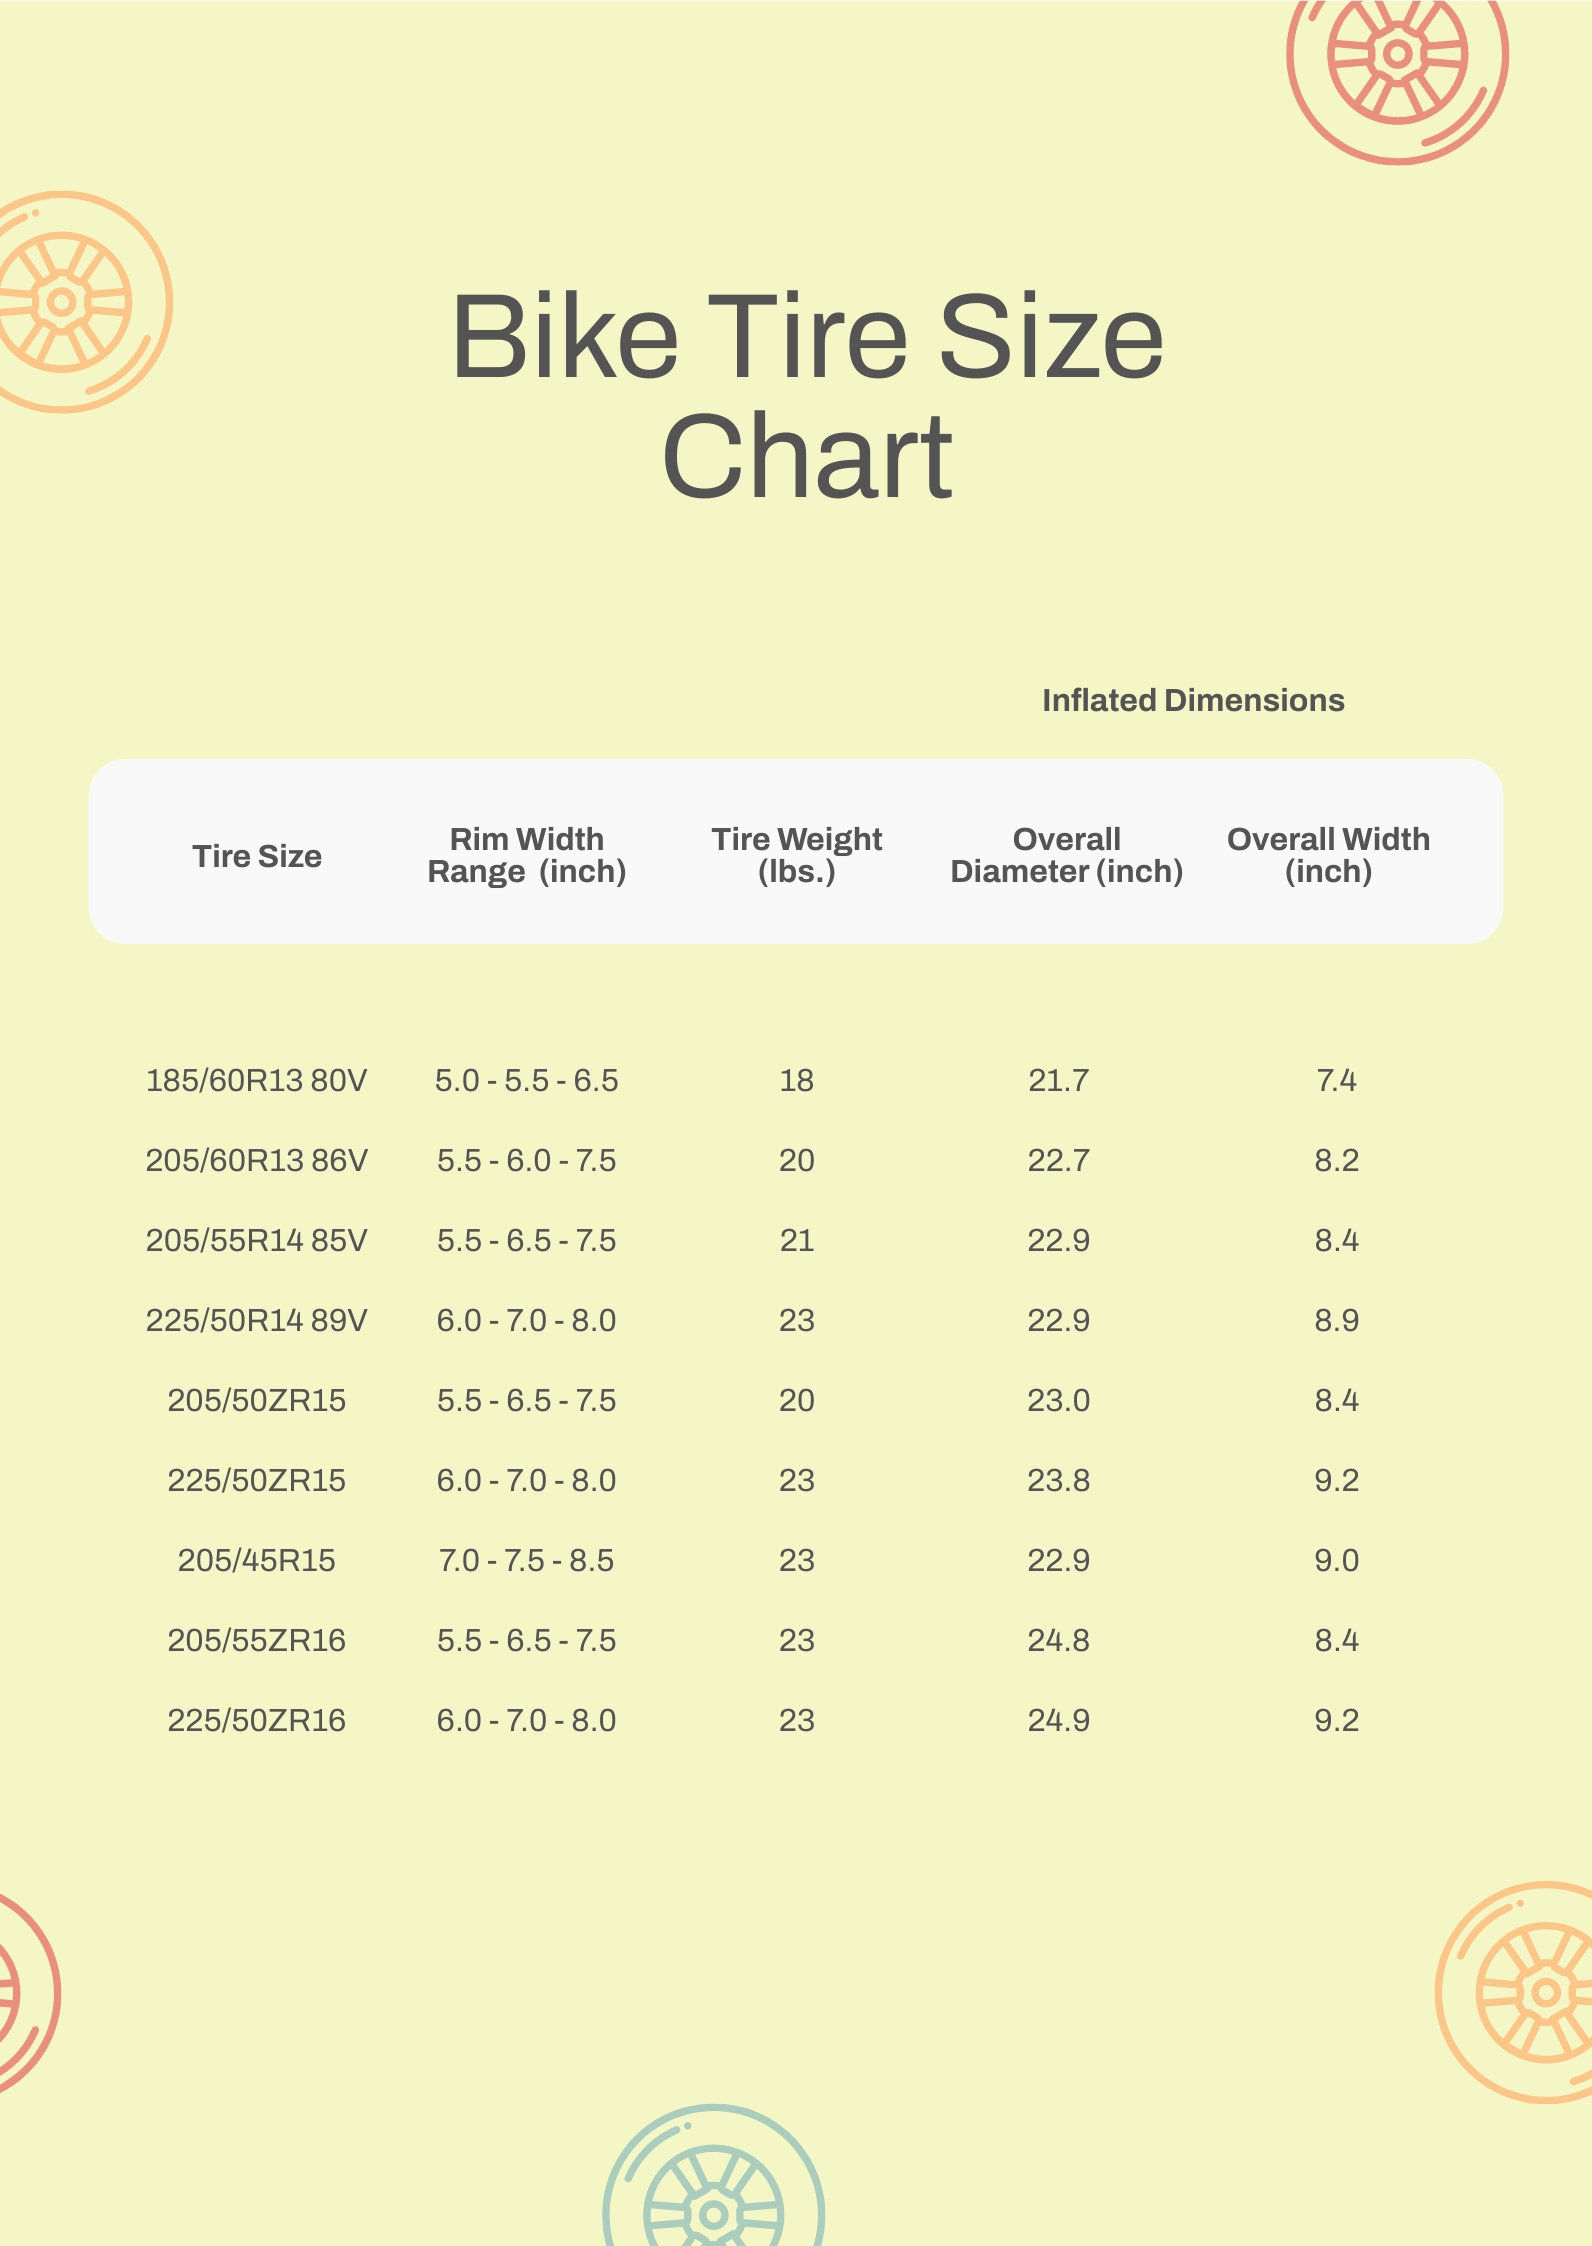
The chart typically includes width, diameter, and compatibility information. This guide will help you avoid common mistakes and ensure your bike operates at its best. Proper tire sizing also enhances grip, reduces wear, and improves overall bike handling. Always consult a reliable chart to ensure you pick the perfect tire for your needs.

Introduction To Road Bike Tires

Road bike tires are crucial for your cycling experience. They affect speed, comfort, and safety. Understanding tire sizing helps you choose the right tires. This guide will make it easy to grasp the essentials.

Importance Of Proper Tire Sizing

Proper tire sizing impacts your bike's performance. Incorrect sizes can lead to accidents or poor handling. Let's explore why it matters:

  • Speed: Right sizes ensure optimal speed and efficiency.
  • Comfort: Properly sized tires offer a smoother ride.
  • Safety: Correct sizing reduces the risk of blowouts.

Use a tire sizing chart to select the perfect tires for your bike. This chart helps you match tire width and diameter to your bike.

Common Tire Types

Road bike tires come in different types. Each type serves a unique purpose. Here are the common types:

  1. Clincher Tires: These are the most popular. They are easy to install and repair.
    • Require inner tubes
    • Affordable and widely available
  2. Tubeless Tires: These provide a smoother ride. They have no inner tubes.
    • Lower risk of punctures
    • Better traction and comfort
  3. Tubular Tires: Preferred by professional racers. They are glued to the rim.
    • Lighter and more flexible
    • Higher performance but harder to repair

Choose the type that fits your cycling needs. Each type offers unique benefits.
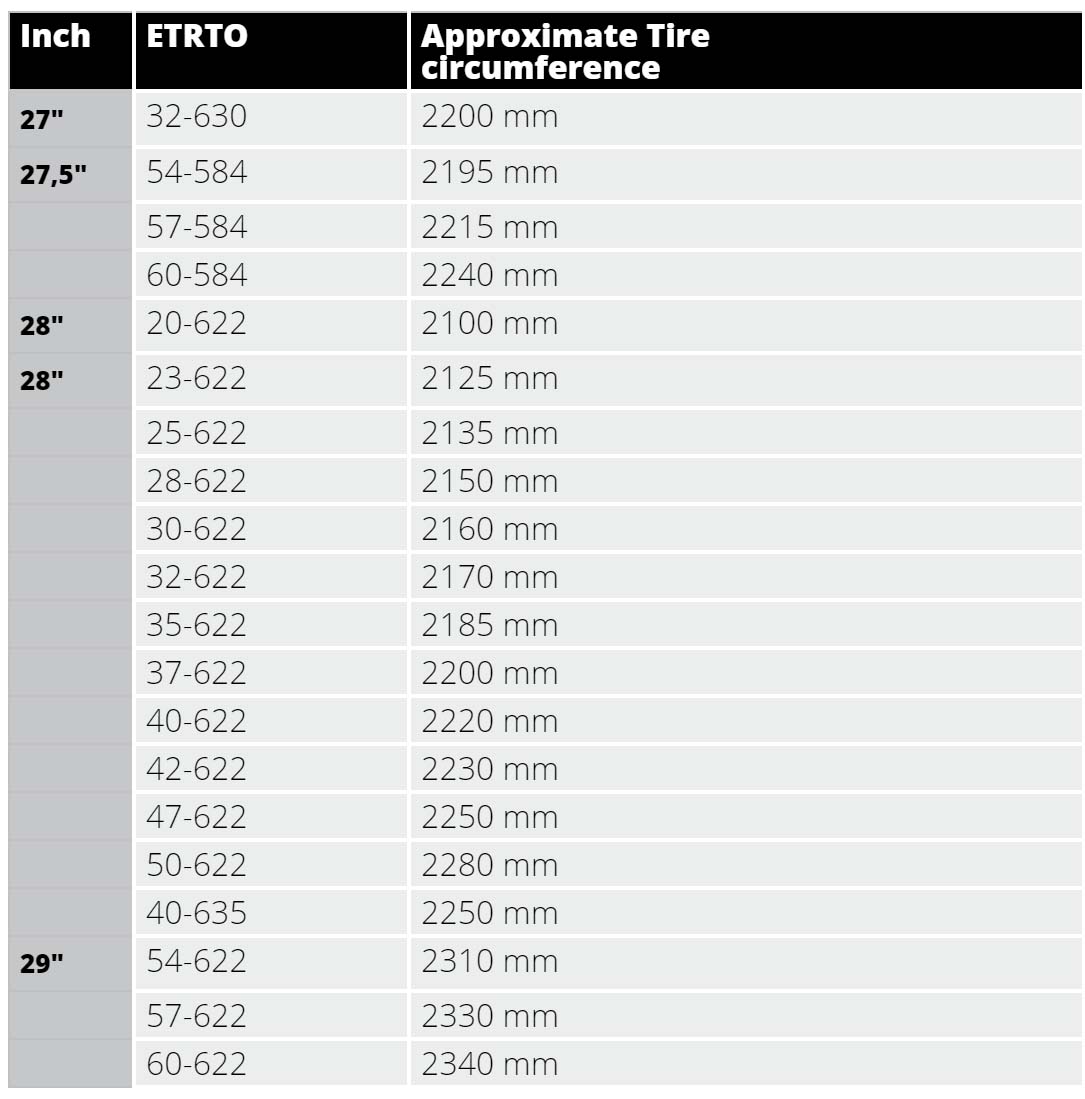
Road Bike Tire Sizing Chart
ETRTO Inch French
23-622 700x23C 23-700
25-622 700x25C 25-700
28-622 700x28C 28-700

Use this chart to find the right tire size for your bike. It lists sizes in different formats.

Road Bike Tire Sizing Chart: Find Your Perfect Fit Today!

Credit: bikerumor.com

Understanding Tire Sizes

Choosing the right tire size for your road bike is essential. It affects performance, comfort, and safety. In this guide, we'll help you understand the two main aspects of tire sizing: Tire Width and Tire Diameter.

Tire Width

Tire width is the measurement of the tire's surface that touches the ground. It is usually measured in millimeters (mm). Common road bike tire widths range from 23mm to 32mm.

Here’s a simple table to illustrate common tire widths and their typical uses:

Tire Width (mm) Best For
23mm Racing
25mm General Road Cycling
28mm Commuting
32mm Long-Distance Touring

Wider tires offer more comfort and better grip. Narrower tires are lighter and faster but less comfortable.

Tire Diameter

Tire diameter is the measurement of the tire's outer circumference. It is typically measured in inches. The most common diameter for road bikes is 700c.

Here are the common tire diameters:

  • 700c - Standard for road bikes
  • 650b - Smaller wheels, often used on gravel bikes

700c tires are suitable for most road biking needs. 650b tires are for smaller frames or specific terrains.

Understanding these measurements helps you select the right tire for your needs. Choose wisely for the best riding experience.

Measuring Your Current Tires

Accurate tire measurements are essential for a smooth ride. Knowing your tire size is crucial for bike maintenance and performance. This section explains how to measure your current road bike tires.

Tools Needed

  • Ruler or Measuring Tape: Essential for measuring tire diameter and width.
  • Caliper: Useful for precise width measurements.
  • Notebook and Pen: Record your measurements for future reference.
  • Bike Stand: Keeps your bike stable during measurement.

Step-by-step Guide

  1. Stabilize Your Bike: Place your bike on a stand to keep it steady.
  2. Measure Tire Diameter: Use a ruler to measure the tire's diameter from edge to edge.
  3. Measure Tire Width: Use a caliper to measure the width of the tire at its widest point.
  4. Check the Tire Label: Look for size information printed on the tire sidewall. It usually shows in the format “700x25c”.
  5. Record Measurements: Write down the diameter and width in your notebook.
Measurement Tool Details
Diameter Ruler or Measuring Tape Measure from edge to edge across the tire.
Width Caliper Measure the widest part of the tire.
Label Check None Read size info on the tire sidewall.

Accurate measurements help you choose the right tire size. This ensures a better biking experience and safety.

Road Bike Tire Sizing Chart: Find Your Perfect Fit Today!

Credit: www.template.net

Tire Sizing Chart Explained

Understanding bike tire sizes can be confusing. A tire sizing chart helps simplify this. This guide will explain how to read and interpret the chart.

Reading The Chart

The tire sizing chart includes important measurements. These include tire width, diameter, and bead seat diameter.

Here is a basic tire sizing chart:

Tire Size Width (mm) Diameter (mm) Bead Seat Diameter (mm)
700x23C 23 700 622
700x25C 25 700 622
700x28C 28 700 622

Interpreting Measurements

Each column in the chart provides specific information:

  • Tire Size: Combination of diameter and width.
  • Width: Tire width in millimeters.
  • Diameter: Outer diameter of the tire.
  • Bead Seat Diameter: Diameter of the tire where it sits on the rim.

For example, a tire labeled 700x23C has a diameter of 700 mm and a width of 23 mm. The bead seat diameter is a constant 622 mm for 700C tires. This helps ensure compatibility with rims.

Knowing these measurements helps you choose the right tire. This ensures a perfect fit for your bike.

Factors Affecting Tire Choice

Choosing the right road bike tire is crucial. Several factors can impact your decision. These include the terrain you will ride on and the weather conditions. Let’s explore these elements in more detail.

Riding Terrain

The surface you ride on can significantly influence your tire choice. Here are some common terrains and their requirements:

  • Smooth Asphalt: Opt for narrow tires (23-25mm). They reduce rolling resistance and increase speed.
  • Rough Roads: Choose wider tires (28-32mm). They offer better comfort and grip.
  • Gravel Paths: Go for even wider tires (35mm+). They ensure stability and traction on loose surfaces.

Weather Conditions

Weather also plays a key role in tire selection. Different conditions call for different tire features:

  • Dry Conditions: Slick or semi-slick tires are ideal. They provide maximum contact with the road.
  • Wet Conditions: Tires with tread patterns are better. They help channel water away and improve grip.
  • Winter Riding: Consider tires with more robust construction. They resist punctures and maintain traction in colder weather.

Understanding these factors helps in making an informed tire choice. This ensures a safer and more enjoyable ride.

Popular Tire Sizes

Choosing the right tire size is crucial for your road bike's performance and comfort. This section will guide you through the most popular road bike tire sizes, ensuring you make an informed decision.

Standard Sizes

Standard tire sizes offer a good balance between speed and comfort. These sizes are suitable for most road biking conditions.

Tire Size Width (mm) Usage
700x23c 23 Racing
700x25c 25 General Road Riding
700x28c 28 Commuting

Performance Sizes

Performance tire sizes are designed for speed and agility. They are often used by competitive cyclists.

  • 700x20c: These tires are very narrow, offering less rolling resistance.
  • 700x22c: Slightly wider, they provide a balance between speed and control.
  • 700x24c: Wider than 22c, they offer more grip and stability.

Each tire size serves a unique purpose. Choosing the right one can improve your biking experience significantly.

Tips For Choosing The Right Tire

Choosing the right road bike tire ensures a smooth and enjoyable ride. The right tire can enhance speed, comfort, and safety. Here are some tips to help you make the best choice.

Matching With Rims

Your tire size should match your rim size perfectly. Check the manufacturer’s specifications for your bike. Use a table to find the right match.

Rim Width (mm) Tire Width (mm)
13 18-25
15 23-32
17 25-50

A tire too wide or narrow for the rim can cause issues. Always double-check the compatibility.

Balancing Speed And Comfort

Speed and comfort are key factors in choosing tires. Narrow tires (23-25mm) are faster and lighter. They suit racing and smooth roads.

  • 23-25mm: High speed, less comfort.
  • 28-32mm: Balance speed and comfort.
  • 35mm+: More comfort, less speed.

Wider tires (28-32mm) offer more comfort and stability. They are ideal for rough roads and long rides.

Assess your riding needs to find the perfect balance.

Road Bike Tire Sizing Chart: Find Your Perfect Fit Today!

Credit: www.schwalbetires.com

Maintaining Your Road Bike Tires

Maintaining your road bike tires is crucial for a safe ride. Proper care ensures longevity and optimal performance. Regular inspections, proper inflation, and timely replacements are key.

Regular Inspections

Inspect your tires before every ride. Look for cuts, punctures, and wear. Check the tread for uneven wear patterns. Ensure there are no embedded objects like glass or stones. Regular checks prevent sudden flats and blowouts.

Proper Inflation

Maintaining the correct tire pressure is essential. Use a reliable tire gauge to check pressure. Refer to the sidewall of your tire for the recommended PSI. Proper inflation improves performance and reduces wear.

Tire Size Recommended PSI
700x23c 100-120 PSI
700x25c 90-110 PSI
700x28c 80-100 PSI

Always check tire pressure before each ride. Under-inflation can cause pinch flats. Over-inflation reduces traction and comfort.

  • Weekly: Check tire pressure.
  • Monthly: Inspect for wear and tear.
  • Annually: Replace old tires.

Frequently Asked Questions

What Size Tires Do Road Bikes Use?

Road bikes typically use tire sizes ranging from 23mm to 32mm. The most common size is 25mm.

How Do I Know My Bike Tire Size?

Check the sidewall of your current tire. It shows the size in millimeters, like 700x25c.

Can I Put Wider Tires On My Road Bike?

Yes, but ensure your bike frame and brakes have enough clearance for wider tires.

Why Choose Narrower Tires For Road Bikes?

Narrower tires reduce rolling resistance, increasing speed on smooth surfaces. They're ideal for racing and smooth roads.

Conclusion

Choosing the right road bike tire size is crucial for performance and safety. Use our sizing chart for guidance. Always consider your riding style and terrain. Proper tire size enhances your biking experience. Stay informed and make smart decisions for a smoother ride.

Happy cycling!

Tuesday, 19 November 2024

How To Change Rear Bike Tire: Quick and Easy Guide

To change a rear bike tire, first, remove the wheel from the bike frame. Then, deflate the tire and detach it from the rim.

Changing a rear bike tire is essential for maintenance and ensuring a smooth ride. Regular checks and timely replacements can prevent unexpected breakdowns. The process may seem daunting at first, but with the right tools and a bit of practice, it becomes straightforward.

Knowing how to change a rear tire can save you time and money, avoiding trips to the bike shop. This skill is crucial for all cyclists, whether you're commuting, mountain biking, or enjoying a leisurely ride. Always have a spare tube and tire levers handy for quick and efficient tire changes on the go.

How To Change Rear Bike Tire: Quick and Easy Guide

Credit: www.sixthreezero.com

Tools And Materials

How To Change Rear Bike Tire - Tools and Materials

Changing your rear bike tire can be easy with the right tools and materials. This section will help you gather everything you need for a smooth tire change.

Essential Tools

Before you start, make sure you have these essential tools:

  • Bike Pump: To inflate the new tire.
  • Tire Levers: For removing the old tire.
  • Wrench: To loosen the wheel nuts.
  • Patch Kit: In case the inner tube needs repairing.
  • Multitool: Handy for various adjustments.

Necessary Materials

In addition to tools, you will need the following materials:

  • New Tire: Ensure it matches your bike's size.
  • Inner Tube: A new or spare tube.
  • Lubricant: To ease tire installation.
  • Rags: For cleaning and wiping hands.

Once you have gathered all these tools and materials, you are ready to change your rear bike tire. Having everything prepared makes the process faster and easier.

How To Change Rear Bike Tire: Quick and Easy Guide

Credit: www.theproscloset.com

Preparation Steps

Changing a rear bike tire can seem daunting, but it's straightforward. Preparing correctly ensures the process is smooth and safe. Follow these preparation steps to make the task easier.

Safety Precautions

Safety is the top priority. Before starting, gather the necessary tools. You will need:

  • Bike repair stand or a sturdy alternative
  • Tire levers
  • Spare tube
  • Air pump
  • Gloves to keep hands clean

Wear gloves to protect your hands. Ensure you have a clean, safe workspace. This reduces the risk of injury. Inspect the bike for any sharp objects. These can cause punctures or injuries.

Bike Positioning

Proper bike positioning is crucial. Follow these steps:

  1. Flip your bike upside down. Rest it on the saddle and handlebars.
  2. Use a bike repair stand if available. This makes the process easier.
  3. Ensure the bike is stable before proceeding. This prevents accidents.

Once your bike is secure, you can start working on the tire. A stable bike makes the task much easier and safer.

Removing The Wheel

Removing the wheel from your bike is the first step in changing the rear tire. This process involves a few key steps: loosening the brakes and releasing the quick release. Follow these steps to get your wheel off quickly and safely.

Loosening The Brakes

First, you need to loosen the brakes. This will give you enough space to remove the wheel. Here's how to do it:

  • Locate the brake calipers.
  • Find the quick-release lever on the brake.
  • Open the lever to release the brake tension.

This step is crucial to avoid any damage to your bike or tire. Make sure the brakes are fully loosened before moving on.

Releasing The Quick Release

Next, you need to release the quick release on the wheel. This will allow you to remove the wheel from the bike frame. Follow these steps:

  1. Locate the quick-release lever on the axle.
  2. Flip the lever to the open position.
  3. Hold the lever and turn the nut on the other side.
  4. Keep turning until the wheel is loose.

Once the wheel is loose, you can easily lift it out of the frame. Make sure to hold the bike steady as you do this.

By following these steps, you can quickly remove the rear wheel and get started on changing your tire.

How To Change Rear Bike Tire: Quick and Easy Guide

Credit: m.youtube.com

Taking Off The Tire

Changing a rear bike tire starts with taking off the tire. This step needs a careful approach. Follow these instructions to do it properly.

Deflating The Tire

First, you need to deflate the tire. Turn your bike upside down. Make sure it is stable. You can use a bike stand or lean it against a wall.

Locate the valve on the tire. Press the small pin inside the valve to release air. If your bike has a Presta valve, unscrew the top before pressing the pin. For Schrader valves, just press the pin. Let all the air out until the tire is completely flat.

Using Tire Levers

Next, you will need tire levers. These tools help you remove the tire from the rim. Insert the first tire lever under the edge of the tire. Push it down to lift the tire over the rim.

Leave the first lever in place. Insert the second lever a few inches away from the first. Slide the second lever around the rim. This will loosen the tire further. Continue this process until the tire is completely off.

Be careful not to damage the inner tube. Remove the inner tube after the tire is off. Now you are ready for the next steps in changing your rear bike tire.

Inspecting The Tube

After removing the rear bike tire, the next step is to inspect the tube. Proper inspection can prevent future punctures and ensure a smooth ride. This step involves checking for damage and cleaning the rim.

Checking For Damage

First, carefully inspect the tube for any visible damage. Look for punctures, tears, or worn-out spots. Inflate the tube slightly to make it easier to find holes.

  • Check for small punctures using a bucket of water.
  • Submerge the tube and look for air bubbles.
  • Mark any holes you find with chalk or a marker.

Pay attention to the valve stem as well. Ensure it is not bent or leaking. If the tube shows significant damage, replace it to avoid future problems.

Cleaning The Rim

Before installing a new tube, clean the bike's rim. Dirt and debris can cause punctures.

  1. Use a clean cloth to wipe down the rim.
  2. Check the rim for sharp edges or embedded objects.
  3. Remove any small stones or glass pieces.

Ensure the rim tape is in good condition. Replace it if it looks worn or damaged. This step ensures a smooth ride and prolongs the life of your new tube.

Step Action Tools Needed
1 Inspect Tube Bucket, Water, Chalk
2 Clean Rim Cloth

Following these steps for inspecting the tube can save you time and effort. Ensuring the tube and rim are in excellent condition leads to a better biking experience.

Installing The New Tube

Changing a rear bike tire might seem tough. But, installing the new tube is easy with the right steps. This section will guide you through inflating the tube and positioning it inside the tire.

Inflating The Tube

Before placing the tube inside the tire, inflate it a little. This helps the tube keep its shape. Use a hand pump or floor pump. Add just enough air so the tube is round but not tight.

Positioning Inside The Tire

Now, put the tube inside the tire. Start by placing the valve through the hole in the rim. Make sure the valve sits straight. Then, work the rest of the tube into the tire. Use your fingers to gently push it in.

Ensure the tube is not twisted. Check that it sits evenly inside the tire. Now, you are ready to mount the tire back on the rim.

Reattaching The Tire

Reattaching the tire is a crucial step in maintaining your bike. A properly reattached tire ensures a safe and smooth ride. Follow these steps to get your tire back on in no time.

Seating The Bead

First, align the tire bead with the rim. The bead is the edge of the tire that fits into the rim. Start at the valve stem and work your way around.

Use your hands to push the bead into the rim. Ensure that the tire sits evenly. Check both sides to confirm the bead is seated properly.

If the bead is not seated, the tire may wobble. This could lead to unsafe riding conditions.

Inflating To Proper Pressure

Once the bead is seated, it's time to inflate the tire. Check the sidewall of the tire for the recommended pressure. Use a reliable tire gauge.

Attach the pump to the valve and start inflating. Monitor the pressure closely. Over-inflation can cause the tire to burst.

Inflate the tire until it reaches the recommended pressure. Finally, remove the pump and ensure the valve is secure.

Your tire is now ready for a safe ride. Remember to check the pressure regularly.

Reinstalling The Wheel

Reinstalling the rear bike tire is a crucial step. Ensuring the wheel is properly aligned and secured is essential for safety. Let's break down the process step by step.

Aligning The Wheel

First, position the wheel back into the frame's dropouts. Ensure the axle fits snugly. The wheel should sit straight in the frame. Misalignment can cause wobbling and unsafe riding.

Next, check that the tire sits evenly between the brake pads. This ensures the brakes function properly. Spin the wheel to verify it rotates smoothly.

Securing The Quick Release

Most modern bikes use a quick release skewer. Begin by inserting the skewer through the axle. Tighten the nut on the opposite side.

Close the quick release lever. It should be firm but not too tight. You should use some force to close it. If it’s too easy, it’s too loose. If it’s too hard, it’s too tight.

Double-check the wheel alignment. Ensure the tire is still centered and the brakes function correctly. Your rear bike tire is now securely reinstalled.

Tip: Always test your bike in a safe area before heading out.

Final Checks

After replacing your rear bike tire, it's crucial to perform final checks. These checks ensure your bike runs smoothly and safely. Let's dive into the steps you need to follow.

Brake Adjustment

First, make sure your brakes are functioning properly.

  • Check if the brake pads touch the rim evenly.
  • Adjust the brake cable tension if needed.
  • Ensure the brake levers respond promptly.

Proper brake adjustment is vital for your safety on the road.

Test Ride

Next, take your bike for a quick test ride.

  1. Start by riding on a flat surface.
  2. Listen for unusual noises from the rear tire.
  3. Test the brakes by stopping suddenly.

Ensure the bike feels stable and secure during the ride. A test ride helps you identify any hidden issues.

By performing these final checks, you ensure a safe and smooth ride.

Frequently Asked Questions

How Do I Remove The Rear Bike Tire?

First, shift to the smallest gear. Release the brake and quick-release lever. Pull the derailleur back and remove the wheel.

What Tools Do I Need To Change A Bike Tire?

You'll need tire levers, a pump, and a new inner tube. Optionally, a multi-tool can be helpful for adjustments.

How Do I Install A New Inner Tube?

Deflate the old tube and remove it. Insert the new tube, inflate slightly, and fit it inside the tire. Ensure it's not pinched.

How Do I Reattach The Rear Bike Tire?

Align the tire with the chain and derailleur. Place it back into the dropouts. Tighten the quick-release lever.

Conclusion

Changing a rear bike tire is simpler than it seems. Follow the steps methodically for a smooth process. With practice, it becomes second nature. Regular maintenance ensures a safe and enjoyable ride. Now, you're ready to hit the road with confidence and ease.

Happy biking!

Monday, 18 November 2024

How Long Does It Take To Bike 2 Miles: Quick & Easy Guide

It typically takes 10 to 15 minutes to bike 2 miles. Time varies based on speed and terrain.

Biking 2 miles is a manageable distance for most cyclists. A beginner might take around 15 minutes, while an experienced rider could complete it in 10 minutes. Factors such as terrain, weather, and bike type can influence the time. Flat roads allow for faster biking, whereas hills and rough paths slow you down.

Regular biking improves speed and endurance. Riding a well-maintained bike also helps achieve better times. For fitness enthusiasts, biking 2 miles can be a quick, effective workout. It’s an eco-friendly way to travel short distances.

How Long Does It Take To Bike 2 Miles: Quick & Easy Guide

Credit: www.cyclistshub.com

Factors Affecting Time

How Long Does It Take To Bike 2 Miles: Factors Affecting Time

Biking 2 miles can take different times. Many factors can change this time. Some factors include terrain and weather conditions. These factors can make your ride faster or slower.

Terrain

The terrain can change your biking speed. Flat roads are easier to bike on. You can bike faster on flat roads. Hilly areas are harder. You may need to go slower. The type of road also matters. Smooth roads are easy. Rough roads can slow you down.

Terrain Type Effect on Time
Flat Roads Faster
Hilly Areas Slower
Smooth Roads Faster
Rough Roads Slower

Weather Conditions

Weather can also change your biking time. Sunny days are ideal for biking. You can bike faster on sunny days. Rain can make roads slippery. You may need to go slower. Wind can help or hinder. Tailwinds push you forward. Headwinds slow you down.

  • Sunny: Fast
  • Rainy: Slow
  • Windy: Depends on wind direction

Bike Types

When biking 2 miles, the type of bike you use matters. Different bikes offer various speeds and comfort levels. Choosing the right bike can affect your biking time.

Road Bikes

Road bikes are designed for speed on smooth surfaces. They have lightweight frames and thin tires. This combination allows for faster travel. Biking 2 miles on a road bike can take around 6 to 8 minutes. These bikes are ideal for city commuting and long-distance rides.

Key Features:

  • Lightweight frame
  • Thin tires
  • Drop handlebars for an aerodynamic position

Road bikes are great for those who want a quick ride on paved roads.

Mountain Bikes

Mountain bikes are built for rough terrains. They have sturdy frames and wide tires with deep treads. This makes them slower but more stable on uneven paths. Biking 2 miles on a mountain bike might take 10 to 12 minutes. These bikes excel on trails and off-road paths.

Key Features:

  • Sturdy frame
  • Wide, knobby tires
  • Flat handlebars for better control

Mountain bikes are perfect for those who enjoy biking on rough paths.

Bike Type Average Time for 2 Miles
Road Bike 6-8 minutes
Mountain Bike 10-12 minutes

Rider Experience

Biking 2 miles can vary greatly depending on the rider's experience. Let's explore how rider experience impacts the time taken to bike this distance.

Beginner Riders

For those new to biking, covering 2 miles might take a bit longer. Beginners often ride at a slower pace, around 8-10 mph. This slower pace is due to their lack of experience and confidence on the bike.

Here is an estimated time for beginner riders:

Riding Speed (mph) Time to Bike 2 Miles (minutes)
8 mph 15 minutes
10 mph 12 minutes

Beginners should focus on building confidence and enjoying the ride. It’s important to take breaks and stay hydrated.

Experienced Cyclists

Experienced cyclists have better bike handling skills. They can maintain a higher speed, around 15-20 mph. Their enhanced skills and strength allow them to cover 2 miles quickly.

Here is an estimated time for experienced cyclists:

Riding Speed (mph) Time to Bike 2 Miles (minutes)
15 mph 8 minutes
20 mph 6 minutes

Experienced cyclists can enjoy the ride at higher speeds without compromising safety. They can navigate through traffic and obstacles more efficiently.

Regardless of experience, always wear a helmet and follow road safety rules.

How Long Does It Take To Bike 2 Miles: Quick & Easy Guide

Credit: www.bikelockwiki.com

Average Speed

Biking 2 miles can vary in time depending on your speed. Understanding the average speed helps you plan your ride better. Speed varies based on factors like fitness and bike type.

Typical Speed Ranges

Speed can range from slow to fast. Here are some common speeds:

  • Beginner riders: 6-9 mph
  • Intermediate riders: 10-14 mph
  • Advanced riders: 15-20 mph

Most people fall into the beginner or intermediate range. Advanced riders often ride faster and cover more distance.

Impact On Time

Let's see how speed affects your time to bike 2 miles:

Speed (mph) Time to Bike 2 Miles
6 mph 20 minutes
9 mph 13.33 minutes
12 mph 10 minutes
15 mph 8 minutes
18 mph 6.67 minutes

Higher speeds result in shorter times. If you bike at 6 mph, it takes 20 minutes. At 18 mph, it only takes 6.67 minutes. Knowing your speed helps you calculate your biking time.

Improving Your Time

Improving your biking time for a 2-mile ride can be exciting. Whether you are a beginner or an experienced rider, there are ways to enhance your performance. Below are some tips and strategies to help you bike faster and more efficiently.

Training Tips

Consistent training is crucial for improving your biking time. Follow these tips:

  • Set specific goals: Aim for a target time for your 2-mile ride.
  • Interval training: Alternate between high and low-intensity riding.
  • Strength training: Build leg muscles with squats and lunges.
  • Rest and recovery: Allow your body to heal and grow stronger.

Equipment Upgrades

Upgrading your equipment can make a big difference. Consider these options:

Equipment Upgrade Benefit
Bike frame Lighter materials Reduces effort needed
Tires High-performance tires Increases speed and grip
Gears Precision shifting Enhances control
Saddle Comfortable and ergonomic Improves riding posture

With the right training and equipment, you can significantly improve your biking time for a 2-mile ride. Stay committed to your goals and enjoy the ride!

Safety Considerations

Before biking 2 miles, safety should be your top priority. This section covers essential safety tips to ensure a safe ride. Follow these guidelines to protect yourself on the road.

Protective Gear

Wearing the right protective gear is crucial for biking. Always wear a helmet to protect your head. Knee and elbow pads can prevent injuries in case of a fall. Don't forget to wear reflective clothing. It makes you visible to drivers, especially at night.

  • Helmet: Protects your head from serious injuries.
  • Reflective Clothing: Increases your visibility to others.
  • Knee and Elbow Pads: Prevents scrapes and bruises.
  • Gloves: Provides better grip and protects your hands.

Traffic Rules

Understanding and following traffic rules is essential for your safety. Biking is safer when you follow the same rules as cars. Always ride in the same direction as traffic. Use hand signals to communicate your intentions to drivers.

Here are some important rules to remember:

  1. Ride on the right side of the road.
  2. Use hand signals to indicate turns.
  3. Obey all traffic lights and signs.
  4. Watch for pedestrians and other bikers.

Stay alert and avoid distractions like headphones. Keep your eyes on the road and be aware of your surroundings.

Rule Importance
Ride on the right Stay in the flow of traffic
Use hand signals Communicate with drivers
Obey traffic lights Ensure safe crossings
Stay alert Avoid accidents

Following these safety tips makes biking 2 miles safer and more enjoyable.

How Long Does It Take To Bike 2 Miles: Quick & Easy Guide

Credit: www.bikelockwiki.com

Frequently Asked Questions

How Long Does It Take To Bike 2 Miles?

On average, it takes about 10-15 minutes to bike 2 miles. This depends on factors like terrain, fitness level, and bike type.

What Factors Affect Biking 2 Miles Time?

Several factors can affect biking time, including terrain, fitness level, bike type, and weather conditions. Uphill routes and strong winds can slow you down.

Is 2 Miles A Good Bike Ride Distance?

Yes, 2 miles is a manageable distance for most people. It's a great way to get some exercise and enjoy the outdoors.

How Fast Should I Bike 2 Miles?

A moderate biking speed is around 12-14 mph. At this pace, you can cover 2 miles in about 10 minutes.

Conclusion

Biking 2 miles can vary in time based on several factors. Your fitness level, bike type, and terrain all play roles. Typically, it can take anywhere from 10 to 20 minutes. Regular biking improves speed and stamina. Enjoy your ride and track your progress over time!

Sunday, 17 November 2024

How Long Does It Take To Bike 10 Miles: Expert Tips & Insights

Biking 10 miles usually takes 45 minutes to an hour. Time varies based on fitness level and terrain.

Cycling is an excellent way to stay fit and explore the outdoors. Biking 10 miles can be a manageable goal for most people, whether you're a beginner or an experienced cyclist. Factors like terrain, weather, and personal fitness can influence how long it takes.

Flat surfaces and good weather conditions typically allow for faster rides, while hills and adverse weather can slow you down. Regular cycling improves cardiovascular health, builds muscle, and enhances mental well-being. Setting a 10-mile goal is a great way to challenge yourself and track your progress. Aim to enjoy the journey and the benefits of being active.

Factors Affecting Biking Time

Understanding the factors affecting biking time can help you plan your rides better. Different elements can influence how long it takes to bike 10 miles.

Terrain And Elevation

The type of terrain you bike on matters a lot. Flat roads are easy to bike on. But, hilly areas slow you down. Steep slopes make you pedal harder. Downhill paths might speed you up. The elevation changes affect your speed. A flat terrain is best for a quick ride.

Weather Conditions

Weather plays a big role in biking time. Sunny days make biking easy. Rain can slow you down. Windy days are tough. A strong headwind makes biking hard. A tailwind can help you go faster. Extreme weather affects your safety and speed.

Bike Type And Condition

The type of bike you use matters. A road bike is fast. A mountain bike is slower on roads. The condition of your bike is crucial. Well-maintained bikes run better. Old or poorly maintained bikes slow you down. Proper tire pressure and a well-oiled chain make a big difference.

Factor Effect on Biking Time
Terrain Flat roads are faster; hills slow you down.
Weather Sunny days are best; rain and wind slow you down.
Bike Type Road bikes are fast; mountain bikes are slower on roads.
Bike Condition Well-maintained bikes are faster.
How Long Does It Take To Bike 10 Miles: Expert Tips & Insights

Credit: cyced.cc

Average Time To Bike 10 Miles

Biking 10 miles is a great way to stay fit and enjoy the outdoors. The time it takes to bike 10 miles varies by skill level. Let's explore the average times for different levels of cyclists.

Beginner Cyclists

Beginner cyclists often ride at a slower pace. They might average around 8-10 miles per hour. This means it could take them about 1 to 1.5 hours to bike 10 miles.

  • Speed: 8-10 miles per hour
  • Time: 1 to 1.5 hours

Intermediate Riders

Intermediate riders have more experience and can ride faster. They may average between 12-15 miles per hour. This allows them to cover 10 miles in 40 to 50 minutes.

  • Speed: 12-15 miles per hour
  • Time: 40 to 50 minutes

Experienced Cyclists

Experienced cyclists can maintain high speeds. They often ride at 16-20 miles per hour. This means they can bike 10 miles in 30 to 40 minutes.

  • Speed: 16-20 miles per hour
  • Time: 30 to 40 minutes
Skill Level Average Speed (mph) Time to Bike 10 Miles
Beginner Cyclists 8-10 1 to 1.5 hours
Intermediate Riders 12-15 40 to 50 minutes
Experienced Cyclists 16-20 30 to 40 minutes

Tips For Improving Speed

Biking 10 miles faster is a goal many cyclists aim for. To achieve this, you need to focus on several key areas. Enhancing your speed requires the right gear, consistent training, and proper nutrition.

Proper Gear And Equipment

Having the right gear can significantly impact your biking speed. Here are some essential items:

  • Road Bike: A lightweight road bike can help you ride faster.
  • Helmet: Always wear a helmet for safety and aerodynamics.
  • Clothing: Wear form-fitting clothes to reduce wind resistance.
  • Bike Shoes: Use clipless pedals and bike shoes for better power transfer.
Equipment Benefit
Road Bike Lightweight and faster
Helmet Safety and aerodynamics
Clothing Reduces wind resistance
Bike Shoes Better power transfer

Training And Conditioning

Improving your speed involves consistent training and conditioning. Follow these tips:

  1. Interval Training: Alternate between high and low intensity.
  2. Strength Training: Build leg muscles with squats and lunges.
  3. Endurance Rides: Increase your stamina with longer rides.
  4. Rest Days: Allow your muscles to recover by taking rest days.

Nutrition And Hydration

Proper nutrition and hydration play a crucial role in your biking performance. Keep these points in mind:

  • Balanced Diet: Eat a mix of carbs, proteins, and fats.
  • Hydration: Drink water before, during, and after your ride.
  • Energy Gels: Use energy gels for quick fuel during long rides.
  • Post-Ride Nutrition: Replenish with a protein-rich snack after biking.

Safety Considerations

Biking 10 miles is a great workout, but safety is key. Ensuring your safety involves wearing the right gear, understanding road safety, and handling traffic effectively.

Protective Gear

Wearing protective gear is essential. Always wear a helmet to protect your head. Gloves can protect your hands in a fall. Consider wearing reflective clothing to be visible at night. Knee and elbow pads can prevent injuries in accidents.

Here is a quick checklist:

  • Helmet
  • Gloves
  • Reflective clothing
  • Knee and elbow pads

Road Safety Tips

Understanding road safety can save lives. Always ride on the right side of the road. Obey all traffic signals and signs. Use hand signals to communicate with drivers. Stay alert and avoid distractions.

Here are some road safety tips:

  1. Ride on the right side
  2. Obey traffic signals and signs
  3. Use hand signals
  4. Stay alert

Handling Traffic

Handling traffic can be challenging. Be aware of your surroundings. Keep a safe distance from cars. Avoid riding in blind spots. Use bike lanes whenever possible. Make eye contact with drivers to ensure they see you.

Remember these tips:

  • Stay aware of surroundings
  • Keep a safe distance from cars
  • Avoid blind spots
  • Use bike lanes
  • Make eye contact with drivers

Benefits Of Biking 10 Miles

Biking 10 miles is an excellent way to stay fit and healthy. It offers numerous benefits that improve your physical health, mental well-being, and the environment. Let's explore the key advantages of biking 10 miles.

Physical Health

Biking 10 miles can boost your cardiovascular health. It strengthens your heart and lungs. Cycling also helps burn calories, aiding in weight loss. It tones your muscles, especially in the legs and core. Regular biking improves endurance and stamina.

Here are some physical benefits of biking:

  • Improved heart health
  • Increased muscle strength
  • Better lung capacity
  • Weight management

Mental Well-being

Cycling 10 miles can uplift your mood. It releases endorphins, which are feel-good hormones. Biking reduces stress and anxiety levels. It also improves mental clarity and focus.

Benefits for mental well-being include:

  • Reduced stress
  • Enhanced mood
  • Better focus
  • Improved mental clarity

Environmental Impact

Biking 10 miles helps reduce carbon emissions. It's a green mode of transport. It decreases air pollution and reduces traffic congestion. Biking also conserves energy and resources.

Environmental benefits include:

  • Reduced carbon footprint
  • Less air pollution
  • Decreased traffic
  • Energy conservation

Common Challenges And Solutions

Biking 10 miles can be a rewarding experience. Yet, it comes with its own set of challenges. Understanding these common issues and knowing how to tackle them can make your ride smoother and more enjoyable.

Dealing With Fatigue

Fatigue is a common challenge for bikers. It can slow you down and make the ride less enjoyable. To combat fatigue, take short breaks every few miles. Stay hydrated and eat energy-boosting snacks like bananas or energy bars. Keeping a steady pace is also essential.

Managing Injuries

Injuries can occur while biking. They can range from minor scrapes to serious muscle strains. Always wear protective gear like helmets and knee pads. Stretch before and after your ride to prevent muscle strains. If you feel any pain, stop biking and rest.

Overcoming Weather Obstacles

Weather can be unpredictable. Rain, wind, or extreme heat can make biking difficult. Check the weather forecast before heading out. Dress appropriately for the weather conditions. Wear layers in cold weather and use waterproof gear in the rain. In hot weather, bike early in the morning or later in the evening to avoid the heat.

Expert Insights

Curious about how long it takes to bike 10 miles? Let's explore expert advice, trainer recommendations, and common mistakes to avoid.

Professional Cyclists' Advice

Professional cyclists can bike 10 miles in 20-30 minutes. They have years of training and experience. Here are some tips from them:

  • Consistency: Ride regularly to build stamina.
  • Proper Gear: Use quality bikes and helmets.
  • Hydration: Drink water before, during, and after rides.

Trainer Recommendations

Trainers offer practical advice for biking 10 miles:

Tip Description
Warm-Up Always start with a 5-minute warm-up.
Intervals Alternate between fast and slow speeds.
Cool Down End with a 5-minute cool-down.

Common Mistakes To Avoid

Avoid these common mistakes:

  1. Skipping Warm-Up: Always start with a warm-up.
  2. Improper Posture: Maintain a correct riding posture.
  3. Overexertion: Don't push too hard, too soon.
How Long Does It Take To Bike 10 Miles: Expert Tips & Insights

Credit: www.pinch-flat.com

Tracking Progress

Tracking your biking progress can be very rewarding. It helps you stay motivated and see how far you've come. Measuring your biking journey can also help you set new goals and challenge yourself.

Using Apps And Gadgets

Many apps and gadgets can help you track your biking progress. These tools can measure distance, speed, and even calories burned. They provide data that can help you understand your biking habits.

  • Smartphone Apps: Apps like Strava or MapMyRide can track your rides.
  • GPS Devices: Devices like Garmin Edge provide detailed stats.
  • Fitness Trackers: Wearables like Fitbit can monitor your heart rate and distance.

Setting Realistic Goals

Setting realistic goals is important for steady improvement. Don't aim too high at first. Start with small, achievable goals. For example, aim to bike 10 miles in one hour. Once you achieve this, set a new goal.

  1. Short-Term Goals: Aim for weekly or monthly targets.
  2. Long-Term Goals: Plan for yearly milestones.
  3. Adjust as Needed: Change your goals based on your progress.

Monitoring Improvement

Monitoring your improvement keeps you motivated. Look at your data regularly. Notice how your speed and distance improve over time. This will help you see your hard work paying off.

Track your progress with a simple table:

Week Distance (Miles) Time (Minutes)
1 10 60
2 10 55
3 10 50

Keep a record of your achievements. This will help you stay focused and motivated. Celebrate your milestones, no matter how small they seem.

How Long Does It Take To Bike 10 Miles: Expert Tips & Insights

Credit: www.pinch-flat.com

Frequently Asked Questions

How Long To Bike 10 Miles On Average?

It typically takes 45 minutes to 1 hour to bike 10 miles. This depends on your speed, terrain, and fitness level.

What Factors Affect Biking 10 Miles?

Several factors affect biking time: terrain, wind conditions, bike type, and your fitness level. Flat roads and good weather help.

Is Biking 10 Miles Daily Good Exercise?

Yes, biking 10 miles daily is great exercise. It improves cardiovascular health, boosts stamina, and burns calories.

How Fast Should I Bike To Cover 10 Miles?

To cover 10 miles efficiently, aim for a speed of 12-14 mph. This is a moderate and sustainable pace.

Conclusion

Biking 10 miles can vary based on fitness and terrain. Beginners might take an hour, while experienced cyclists may finish faster. Consistent practice improves speed and stamina. Enjoy the journey and the benefits of cycling. Track your progress and set realistic goals to keep motivated.

Happy biking!

Saturday, 16 November 2024

Convert Road Bike To Flat Bar: Ultimate Guide for Cyclists

To convert a road bike to a flat bar, replace the drop handlebars with flat handlebars. Also, adjust the brake and gear systems.

Converting a road bike to a flat bar offers comfort and improved control. This modification is popular among cyclists seeking an upright riding position. The process involves changing the handlebars, brake levers, and shifters. Most road bikes are compatible with flat bars, making the switch straightforward.

The new setup can enhance your commuting or leisure riding experience. Ensure you choose the correct components to match your bike’s specifications. This simple upgrade can transform your road bike into a versatile machine, perfect for urban environments and casual rides. Enjoy the benefits of both speed and comfort with this conversion.

Essential Tools

Converting a road bike to a flat bar setup is an exciting project. You will need the right tools to make the switch smooth and efficient. This section covers the essential tools required for the conversion.

Basic Tools

Start with basic tools, which are often already in your toolbox. These tools are essential for any bike maintenance task.

  • Allen Wrenches: Sizes 4mm, 5mm, and 6mm are most common.
  • Screwdrivers: Both Phillips and flat-head screwdrivers.
  • Adjustable Wrench: Useful for various nuts and bolts.
  • Torque Wrench: Ensures bolts are tightened to the correct specification.
  • Cable Cutters: For cutting brake and gear cables cleanly.

Specialized Equipment

Some specialized tools will make the conversion easier and more precise. These are specific to bike maintenance tasks.

  • Bottom Bracket Tool: To remove and install the bottom bracket.
  • Crank Puller: Essential for removing the crankset.
  • Cassette Tool: Needed for removing the rear cassette.
  • Chain Tool: For breaking and rejoining the bike chain.
  • Handlebar Grips: New grips for the flat bar setup.

Having these tools on hand will ensure a smooth conversion process. Each tool plays a vital role in the setup and adjustment of your new flat bar. Investing in quality tools can save time and prevent frustration.

Convert Road Bike To Flat Bar: Ultimate Guide for Cyclists

Credit: www.roadbikereview.com

Choosing Flat Bars

Switching to flat bars can transform your road bike's feel. Flat bars offer better control and comfort. They are perfect for city rides and casual cycling. Let's explore how to choose the right flat bars for your bike.

Types Of Flat Bars

Flat bars come in various shapes and sizes. Each type serves a different purpose. Here are some common types:

  • Standard Flat Bars: Straight and simple. Great for everyday use.
  • Riser Bars: Slightly curved. They raise your riding position.
  • Butted Bars: Thinner in the middle. They are lightweight and strong.

Material Considerations

Flat bars are made from different materials. Each material has its benefits. Here are the most common ones:

Material Benefits
Aluminum Lightweight and affordable. They offer a good balance of strength and weight.
Carbon Fiber Very light and strong. They absorb vibrations well. Ideal for long rides.
Steel Durable and strong. They are heavier but more flexible.
Titanium Light and strong. They offer a smooth ride. They are more expensive.

Choosing the right flat bars depends on your needs. Consider the type and material for the best experience.

Removing Drop Bars

Converting your road bike to a flat bar setup can enhance comfort and control. The first step in this transformation is removing the drop bars. This process is straightforward, but it's crucial to follow the steps carefully to ensure a smooth transition. Below, we'll guide you through the necessary safety precautions and a detailed step-by-step guide to remove the drop bars.

Safety Precautions

  • Wear protective gloves to avoid injuries.
  • Ensure your bike is secure on a work stand.
  • Disconnect all cables before starting.
  • Keep a clean workspace to avoid losing small parts.

Step-by-step Guide

  1. Use an Allen key to loosen the bolts on the stem.
  2. Carefully slide the drop bars out of the stem.
  3. Remove handlebar tape to access brake and gear levers.
  4. Detach brake and gear levers using a screwdriver.
  5. Store all parts in a safe place for future use.
Tool Purpose
Allen Key Loosen stem bolts
Screwdriver Detach levers
Gloves Protect your hands

By following these steps, you can easily remove the drop bars from your bike. This process sets the stage for installing flat bars, enhancing your riding comfort and control.

Installing Flat Bars

Converting a road bike to a flat bar setup can be an exciting project. It enhances comfort and control, making your bike more versatile. Follow these simple steps to install flat bars on your bike.

Aligning The Bars

First, ensure your bike is stable on a stand. Loosen the bolts on the stem using an Allen wrench. Remove the existing drop bars carefully.

Next, take your new flat bars and align them with the stem. Make sure the bars are centered and level. Check that the angle of the bars suits your riding style.

Once aligned, hold the bars in place. Ensure they are straight and level. This step is crucial for comfort and control.

Securing The Bars

Now, tighten the bolts on the stem. Use an Allen wrench for this. Tighten each bolt evenly in a crisscross pattern.

Ensure the bars are secure and do not move. Double-check the alignment and make any necessary adjustments.

Attach the brake levers and shifters to the flat bars. Position them for easy access. Tighten the bolts to secure them in place.

Finally, check all components for tightness. Ensure everything is secure before riding. Enjoy your new flat bar setup!

Adjusting Brakes And Gears

Converting your road bike to a flat bar setup means adjusting the brakes and gears. This process ensures your new handlebar configuration works smoothly.

Brake Lever Setup

Start by removing the existing brake levers from your drop bars. Flat bar brake levers are different. They need to be compatible with your road bike brakes.

Attach the new brake levers to the flat bar. Position them so they are comfortable to reach. Use an Allen key to tighten the clamps securely.

Next, reconnect the brake cables to the new levers. Ensure the cables are not frayed. Cut them if necessary. Adjust the brake tension using the barrel adjuster. Test the brakes to ensure they work correctly.

Gear Shifter Installation

Remove the existing gear shifters from the drop bars. Choose flat bar shifters that match your bike's drivetrain.

Install the new gear shifters on the flat bar. Position them next to the brake levers. Ensure they are easy to reach while riding.

Reconnect the gear cables to the new shifters. Adjust the cable tension using the barrel adjuster. Shift through all gears to ensure smooth operation. Fine-tune as needed for precise shifting.

Here's a quick reference table for the tools you might need:

Tool Purpose
Allen Key Set Tightening bolts
Cable Cutters Trimming brake and gear cables
Barrel Adjuster Fine-tuning cable tension

Remember to double-check all adjustments. Test ride your bike to ensure everything works perfectly. Enjoy your newly converted flat bar road bike!

Convert Road Bike To Flat Bar: Ultimate Guide for Cyclists

Credit: hikebikecake.com

Fine-tuning The Fit

Converting a road bike to a flat bar can transform your ride. It offers better control and comfort. Fine-tuning the fit is crucial for an optimal experience. This involves adjusting the handlebar height and ensuring grip comfort.

Handlebar Height

Getting the right handlebar height is key for comfort. A higher handlebar can reduce strain on your back. It also gives you a more upright riding position. Lower handlebars provide a more aerodynamic posture.

Use a table for different heights:

Rider's Height Handlebar Height
5'0" - 5'5" 1-2 inches above seat
5'6" - 6'0" 2-3 inches above seat
6'1" and above 3-4 inches above seat

Grip Comfort

Grip comfort is crucial for long rides. Choose grips that are soft and cushioned. Foam or gel grips are great options. They reduce vibration and hand fatigue.

Consider these tips:

  • Ensure grips are the right size for your hands
  • Use ergonomic grips to support your wrists
  • Regularly check grip condition and replace if worn

Good grips can enhance your overall riding experience. They provide better control and reduce hand pain.

Test Ride And Adjustments

Converting your road bike to a flat bar setup is an exciting project. The transformation process is not complete without a test ride and making necessary adjustments.

Initial Test Ride

The initial test ride helps to identify any immediate issues. Take your converted bike for a short ride. Focus on the feel of the new handlebars. Check if the brake levers are comfortable. Ensure the shifters are within easy reach.

During this ride, pay attention to your riding posture. The new flat bar should not strain your back or wrists. If you experience discomfort, note where it occurs.

Look out for any unusual noises or loose components. A smooth ride indicates a successful conversion. If you encounter issues, don’t worry. These can be fixed during the final adjustments.

Final Adjustments

After the initial test ride, it's time for final adjustments. Fine-tuning ensures a perfect fit and function.

Use the table below to guide your adjustments:

Component Adjustment
Handlebars Adjust height and angle for comfort.
Brake Levers Ensure easy reach and smooth operation.
Shifters Position for quick and easy shifting.
Cables Check tension and routing for smooth operation.

Here’s a checklist for the final adjustments:

  • Recheck handlebar alignment.
  • Ensure brake levers are snug and functional.
  • Adjust shifters for easy access.
  • Tighten all bolts and screws.
  • Test the bike again for comfort and performance.

Once these steps are complete, your bike should feel balanced and comfortable. Another short test ride will confirm the success of your adjustments.

Maintenance Tips

Converting your road bike to a flat bar can improve comfort. However, it requires regular maintenance to keep it in top condition. Here are essential maintenance tips to ensure your bike performs well.

Regular Checks

Perform regular checks to keep your bike running smoothly. Inspect the brakes every week. Check for wear and tear. Ensure the cables are tight and functional. Examine the tires for punctures and proper inflation.

  • Check brake pads for wear
  • Ensure brake cables are tight
  • Inspect tire pressure and condition
  • Lubricate the chain weekly

Common Issues

Be aware of common issues that can affect your bike's performance. These include gear shifting problems, brake issues, and wheel alignment. Identifying these early can prevent bigger issues.

Issue Solution
Gear shifting problems Adjust the derailleur
Brake issues Replace worn brake pads
Wheel alignment True the wheels

Common Gear Issues: If gears don’t shift smoothly, check the derailleur. Make minor adjustments until shifting improves. Brake Problems: If brakes feel weak, inspect the brake pads. Replace them if they are worn out. Wheel Alignment: If wheels wobble, they need truing. Use a truing stand for best results.

Convert Road Bike To Flat Bar: Ultimate Guide for Cyclists

Credit: www.youtube.com

Frequently Asked Questions

Why Convert A Road Bike To Flat Bar?

Converting to a flat bar can improve comfort and control. It also provides a more upright riding position, reducing strain.

What Parts Are Needed For Conversion?

You'll need new flat handlebars, brake levers, shifters, and grips. Ensure compatibility with your bike’s components.

Is It Difficult To Convert To Flat Bars?

Conversion is straightforward but requires basic bike mechanic skills. Follow a guide or seek professional help if unsure.

How Much Does Conversion Cost?

Costs vary based on parts and labor. On average, expect to spend between $100 and $300.

Conclusion

Transforming your road bike to a flat bar offers comfort and versatility. It's a straightforward process with great benefits. Follow our guide to enjoy a more relaxed riding experience. Don't forget to choose the right components for an optimal setup.

Enjoy your new and improved flat bar bike on your next ride!

Friday, 15 November 2024

Bike World 281: Unleashing the Ultimate Riding Experience

Bike World 281 is the go-to source for cycling enthusiasts, offering top-notch gear and expert advice. Their comprehensive selection caters to all levels of riders.

Cycling has become a popular mode of transportation and a favorite recreational activity for many. Bike World 281 excels in providing high-quality bikes, accessories, and cycling apparel. Their knowledgeable staff ensures customers find the perfect fit and gear for their needs.

Whether you're a beginner or a seasoned cyclist, Bike World 281 has something for everyone. They focus on customer satisfaction, offering personalized service and expert advice. Their commitment to quality and service makes Bike World 281 a trusted name in the cycling community. Explore their extensive range and gear up for your next ride.

Introduction To Bike World 281

Welcome to Bike World 281, the ultimate destination for bike enthusiasts. This unique place offers a wide range of bikes and accessories. Whether you're a novice or a pro, there's something for everyone.

The Vision Behind Bike World 281

The founders of Bike World 281 had a clear vision. They wanted to create a hub for all bike lovers. Their goal was to provide quality products and services. They believed every rider deserves the best gear. This vision drives the store's mission every day.

What Makes It Unique

What sets Bike World 281 apart from other stores?

  • Wide Selection: From mountain bikes to road bikes, there's a diverse range.
  • Expert Staff: The team consists of bike enthusiasts and experts.
  • Quality Products: Only the best brands and accessories are available.
  • Customer Service: Exceptional service makes every visit special.
Feature Details
Location Convenient and accessible
Services Repairs, customization, and fittings
Events Workshops, rides, and community events

Bike World 281 is more than a store. It's a community for bike lovers.

Bike World 281: Unleashing the Ultimate Riding Experience

Credit: www.flickr.com

Design And Engineering

Bike World 281 is at the forefront of bicycle innovation. Their design and engineering set them apart in the market. Let's explore their use of cutting-edge technology and innovative materials.

Cutting-edge Technology

Bike World 281 employs the latest technology in their bikes. They use advanced computer modeling for precision. This ensures optimal performance and safety. Their bikes have smart sensors for real-time data. This includes speed, distance, and health metrics. Riders can sync this data with their devices.

Another feature is their integrated GPS system. This helps riders navigate and plan routes. The bikes also have anti-theft systems for security. Riders can lock and unlock their bikes using their smartphones. These features enhance the biking experience significantly.

Innovative Materials

Bike World 281 uses innovative materials in their bikes. They choose lightweight yet strong materials. This includes carbon fiber and high-grade aluminum. These materials make the bikes durable and easy to handle.

The frame design also improves aerodynamics. This helps in reducing air resistance. The tires are made from puncture-resistant rubber. This ensures a smooth and safe ride. They also use eco-friendly materials for sustainability.

Here is a summary of the materials used:

Material Benefit
Carbon Fiber Lightweight and strong
High-Grade Aluminum Durable and easy to handle
Puncture-Resistant Rubber Ensures a smooth and safe ride
Eco-Friendly Materials Sustainable and environmentally friendly

Bike World 281 combines technology and materials perfectly. This makes their bikes a top choice for riders.

Performance Features

The Bike World 281 is a marvel of engineering. It is designed for speed and efficiency. Below are the key performance features that make this bike a standout choice for riders.

Engine Specifications

The engine of the Bike World 281 is a powerhouse. It features a 250cc liquid-cooled engine. This engine ensures smooth and consistent performance. The bike also has a 6-speed transmission, allowing riders to shift gears with ease.

Specification Details
Engine Type Liquid-cooled, 4-stroke
Displacement 250cc
Transmission 6-speed
Fuel System Fuel Injection

Speed And Handling

The Bike World 281 excels in speed and handling. It can reach a top speed of 120 mph. The bike's frame is lightweight and durable, ensuring agility on the road. The dual-disc brakes provide excellent stopping power.

  • Top Speed: 120 mph
  • Braking System: Dual-disc brakes
  • Frame: Lightweight and durable
  • Suspension: Adjustable front and rear

The adjustable suspension ensures a smooth ride on various terrains. The tires are designed for optimal grip and stability. Whether on city roads or off-road trails, the Bike World 281 handles it all with ease.

Bike World 281: Unleashing the Ultimate Riding Experience

Credit: outridebike.org

Safety Measures

At Bike World 281, we prioritize your safety above all. Enjoy your ride with peace of mind. Our advanced safety systems and protective gear ensure you stay protected.

Advanced Safety Systems

Our bikes are equipped with top-notch safety features. These systems reduce the risk of accidents and enhance your riding experience.

  • Anti-lock Braking System (ABS): Prevents wheel lock during sudden braking.
  • Traction Control: Maintains stability on slippery surfaces.
  • LED Headlights: Provides better visibility in low light.

Our technology helps keep you safe on the road. We use sensors and algorithms for real-time monitoring. These features ensure a safer ride.

Protective Gear

Wearing the right gear is crucial for your safety. At Bike World 281, we offer a range of protective gear.

Gear Purpose Materials
Helmet Protects your head Fiberglass, Carbon Fiber
Gloves Protects your hands Leather, Kevlar
Jacket Protects your upper body Leather, Textile
Knee Pads Protects your knees Plastic, Foam

Always wear your helmet and other protective gear. This can significantly reduce injury risks. Our gear is made from high-quality materials.

Stay safe and enjoy your ride with confidence. Visit Bike World 281 for all your biking needs.

Comfort And Ergonomics

Bike World 281: Comfort and Ergonomics

Bike World 281 is designed for ultimate comfort. This bike ensures every ride is enjoyable. Let's explore its comfort and ergonomic features.

Rider Comfort

Rider comfort is crucial for long rides. Bike World 281 excels in this area. It has a padded seat for maximum comfort. The handlebars are positioned for easy reach. This reduces strain on your back and wrists.

The bike frame absorbs shocks from the road. This makes your ride smooth and pleasant. The pedals are designed for easy grip. This reduces foot fatigue during long rides.

Adjustable Features

Bike World 281 offers several adjustable features. These allow you to customize your ride. Let's take a look at them:

Feature Adjustability
Seat Height Adjustable to fit your leg length
Handlebar Position Can be raised or lowered
Suspension Adjustable for different terrains

These features ensure that Bike World 281 fits you perfectly. You can make quick adjustments before you ride. This ensures the best comfort and performance.

  • Adjust the seat height for a perfect fit.
  • Change the handlebar position for comfort.
  • Modify the suspension for a smooth ride.

Bike World 281 is perfect for all riders. Whether you ride daily or occasionally, you will feel the difference.

Customization Options

At Bike World 281, you can make your bike truly your own. Explore a wide range of customization options to suit your style and needs.

Personalized Accessories

Personalizing your bike starts with accessories. Choose from a variety of personalized accessories that enhance both functionality and aesthetics.

  • Handlebar Grips: Soft, durable, and available in different colors.
  • Seats: Choose comfort with padded, gel, or leather seats.
  • Lights: LED lights for better visibility and style.
  • Mirrors: Stylish mirrors to add safety and a custom look.

Use these accessories to make your bike unique and functional.

Color And Style Choices

Bike World 281 offers a vast array of color and style choices. Pick the perfect combination to reflect your personality.

Color Options Style Choices
Classic Black Vintage
Electric Blue Modern
Vibrant Red Sporty
Matte White Urban

Mix and match these options to create a bike that stands out.

Sustainability Initiatives

At Bike World 281, we are dedicated to promoting sustainability. Our initiatives aim to reduce our environmental impact while offering high-quality products. Let's explore our efforts in using eco-friendly materials and controlling emissions.

Eco-friendly Materials

We prioritize the use of eco-friendly materials in our bike manufacturing process. Our bikes are made from recycled aluminum and steel. These materials are not only durable but also reduce waste. We also use biodegradable materials for packaging. This helps minimize plastic waste.

Our commitment to sustainability extends to our accessories. Helmets, gloves, and other gear are made using organic cotton and bamboo. These materials are sustainably sourced and reduce our carbon footprint.

Material Source Benefit
Recycled Aluminum Used cans Reduces mining impact
Recycled Steel Scrap metal Lessens industrial waste
Organic Cotton Certified farms Reduces water usage
Bamboo Sustainable plantations Absorbs CO2

Emission Control

We employ advanced emission control techniques during production. Our factories use renewable energy sources like solar and wind. This significantly reduces greenhouse gas emissions. We also ensure our delivery vehicles are electric.

Our bikes are designed to be energy-efficient. They require less power to operate, reducing emissions. We also encourage customers to use bike-sharing systems. This reduces the number of vehicles on the road.

  • Solar-powered factories
  • Wind energy utilization
  • Electric delivery vehicles
  • Energy-efficient bike designs
  • Promotion of bike-sharing systems

Bike World 281 is at the forefront of sustainable biking. Join us in our journey towards a greener planet.

Testimonials And Reviews

At Bike World 281, customer feedback is crucial. The testimonials and reviews reflect genuine experiences from our community. This section highlights some of the best insights from riders and experts.

Rider Experiences

Our riders share their joy and satisfaction. Here's what they say:

  • John D.: "The bike rides smoothly on rough terrains. I'm thrilled with my purchase."
  • Maria S.: "The customer service at Bike World 281 is top-notch. They helped me choose the perfect bike."
  • Kevin H.: "I love the range of accessories available. My bike feels complete now."

Riders appreciate the quality and service. They feel connected and valued.

Expert Opinions

Experts have reviewed our bikes. They highlight key features and performance.

Expert Review
Jane R. "The durability of these bikes is impressive. Perfect for long rides."
Steve K. "Innovative design and comfortable seats. A great choice for daily commutes."
Linda B. "Excellent battery life on e-bikes. Provides a seamless riding experience."

Experts praise the build quality and innovative features of our bikes. Their reviews boost our credibility.

Bike World 281: Unleashing the Ultimate Riding Experience

Credit: www.facebook.com

Frequently Asked Questions

What Is Bike World 281?

Bike World 281 is a premier destination for bike enthusiasts. It offers a wide range of bicycles, accessories, and services. Whether you're a beginner or a pro, you'll find everything you need.

What Types Of Bikes Does Bike World 281 Offer?

Bike World 281 offers road bikes, mountain bikes, and hybrid bikes. They also have electric bikes and kids' bikes. Their selection caters to all skill levels and preferences.

Does Bike World 281 Provide Bike Repair Services?

Yes, Bike World 281 provides professional bike repair services. Their skilled technicians handle everything from minor repairs to major overhauls. They ensure your bike is always in top condition.

Are There Any Cycling Events At Bike World 281?

Bike World 281 hosts regular cycling events and group rides. These events are perfect for meeting other cyclists and improving your skills. Check their website for the latest schedule.

Conclusion

Bike World 281 offers top-quality bikes for every rider. Their selection ensures you find the perfect fit. Explore their range today and experience unmatched biking adventures. Trust Bike World 281 for quality, performance, and style. Visit them now and elevate your biking experience.

Don't wait, start your journey with Bike World 281.

Kmc X10 10 Speed Chain: Ultimate Performance for Cyclists

The KMC X10 10 Speed Chain is a durable, lightweight chain designed for smooth shifting and long-lasting performan...